My Blinkies :)



Creative Fabrica

Creative Teams






Artists and Store I like


















Cursed Waters

This tutorial is written in Corel 2023, but any version should work, this is written in hopes you have working knowledge of Paint Shop Pro or other graphics program… this is written by me, never meant to copy or look like your work…
I am using a PTU kit
By AngelKKreatioZ
Called Pirates Curse

You can find this kit
AKK-Pirates Curse
I am using a PTU tube
By Goldwasser (I got this when it was at PFD)
Called Loreley

You can now find it
I am using a mask
By Horseplay Mask 30
Horseplay Mask 21-40
Open a 750x750 size tag
F4 c/p size this down by 75%
42 c/p size down by 60% pull to the middle left of the frame
Take the tube i’m using the green layer
5 c/p size this down by 55% pull to the right edge of the frame
99 c/p size this down by 31% pull to sit in front of the tree
c/p size her down by 30% pull to the middle of the frame
188 c/p mirror size this down by 35% pull this to look like it is sitting on the rock on the tube
45 c/p size this down by 25% pull to sit in the middle of the tube
182 c/p size this down by 25% pull to sit under the staff
26 c/p size this down by 25% pull to sit on left edge of E188
64 c/p size this down by 25% pull to sit in front of the tubes tail
136 c/p size this down by 20% pull so the bird is sitting on top of the palm tree
103 c/p size this down by 15% pull so it sits on the bottom of the bird
111 c/p size this down by 20% pull to sit by tall flower, by her tail
109 c/p size this down by 20% pull to sit on the right bottom of the E188
95 c/p size this down by 20% pull to sit on the far right of the tag
48 c/p size this down by 20% pull to sit on left of the skull under glass
20 c/p size this down by 15% pull to sit in front of the glass down
3 c/p mirror size this down by 20% pull to sit on top of the glass dome
2 c/p size this down by 21% pull to sit on top of the palm tree on its far right edge
119 c/p size this down by 15% pull to sit by the glass jar on the left side of the tag
161 c/p size this down by 17% pull to sit on the right of the compass
30 c/p size this down by 17% pull to sit on the left of the glass bottle on the left side of your tag
11 c/p size this down by 35% pull to sit in the middle bottom of the tag
Click on bottom layer of your tag
Flood fill with Background 5 apply the mask from above, merge this into one layer.
Click on top layer of your tag add a new layer for the copyrights for the tube *Make sure you have a valid license to use this tube) add a saying to the tag and you’re done…
©LadyDragus~2026
Tag for kit maker



Seafoam Beach

This tutorial is written in Corel 2023, but any version should work, this is written in hopes you have working knowledge of Paint Shop Pro or other graphics program… this is written by me, never meant to copy or look like your work…
I am working with a PTU kit
BY Happy Pumpkin Studio
Called Seafoam and Sweet Nothings

You can find the kit
Seafoam and Sweet Nothings
I am using a tube
A PTU tube by Barbara Jensen's
( Layerd 123-3) use the colors to match the kit
**No preview**
Tube can be found
Here Layered 123-3
Horse play Pasteur Mask 30
Here Mask 21-40
Open a 750x750
Frame 12 c/p size this down by 55%
16 c/p size this down by 45% pull to the bottom left corner of the frame
18 c/p size this down by 50% pull to the right edge of the frame
Take the colorized version of this tube c/p size it down by 75% pull to the middle bottom of the frame
78 c/p size this down by 36% pull to cover the right hand edge of the tube
126 c/p size this down by 25% pull to stand on the middle edge of the grass
167 c/p size this down by 30% pull to the far right edge of the tag
51 c/p size this down by 25% pull to sit on right edge of the tube
247 c/p size this down by 30% pull to cover up the bottom of the tube
222 c/p size this down by 15% pull to the middle of the drift wood
67 c/p size this down by 15% pull to fly above the umbrella
71 c/p size this down by 20% pull to sit on the left edge of the wood in front of the signs
124 c/p size this down by 18% pull to the far right edge of the tag
118 c/p size this down by 16% pull to sit on left edge of the wood
107 c/p size this down by 13% pull to sit on left edge of the bottle
96 c/p size this down by 11% pull to sit on right edge of the wood
70 c/p size this down by 14% pull to sit in front of the other bird on the ground
Click on bottom layer of your tag
Paper 106 flood fill then apply the mask from above, merge into on raster layer
Click on top most layer of your tag add a new raster layer for the credits and License number , make sure you have a valid Barbra Jensen License, then add a saying to your tag and you’re done…
Thank you for reading my tutorial
©LadyDragus~2026


Steamed Mermaid

This tutorial is written in Corel 2023, but any version should work, this is written in hopes you have working knowledge of Paint Shop Pro or other graphics program… this is written by me, never meant to copy or look like your work…
I am working with a kit
Called Summer Mermaid


Sold DAH Summer Mermaid
and
Sold MSD-Pay Hip Summer Mermaid
I am using a brand new tube
By Misticheskaya
Called Steampunk Mermaid Ulla

You can find this tube
Horsepaly paster mask 37
Here Horse Play Pasture Mask 21-40
Open a 750x750 size tag
Frame 3 c/p size this down by 50%
6 c/p pull to the bottom of the frame
58 c/p mirror this down by 45% pull to the far right edge of the sand
40 c/p size this down by 35% pull to the bottom left of the frame
54 c/p size this down by 45% pull to sit on top of E40
10 c/p size this down by 30% pull to the upper left top of the frame
Take the tube we are using I am using the Green orange and yellow layers c/p mirror then size her down by 26% pull to the middle of the tag
15 c/p size this down by 35% pull to sit in front of the tube we are using
16 c/p size this down by 40% pull to the right edge of the sand
4 c/p size this down by 30% pull to sit in front of rocks
32 c/p size this down by 35% pull to the bottom left of the tag
13 c/p mirror size this down by 30% pull to float above the rocks on right edge of the tag
44 c/p size this down by 26% mirror pull to float by the pearl
12 c/p size this down by 36% pull to the far right edge of the tag
57 c/p size this down by 30% pull to sit on the left hand edge of the tag
Click on bottom layer of your tag
11 c/p size this down by 50% pull the 1st copy to the left and the 2nd one to the right edge of the tag
Flood fill the bottom layer with paper 7 then merge this layer into one
Click on the top most layer of your tag add a new raster for the copyrights and credit to kit maker, then add a saying to the tag and you’re done…
Thank you for reading my tutorial
©LadyDragus~2026
Tags for the kit maker and mask maker


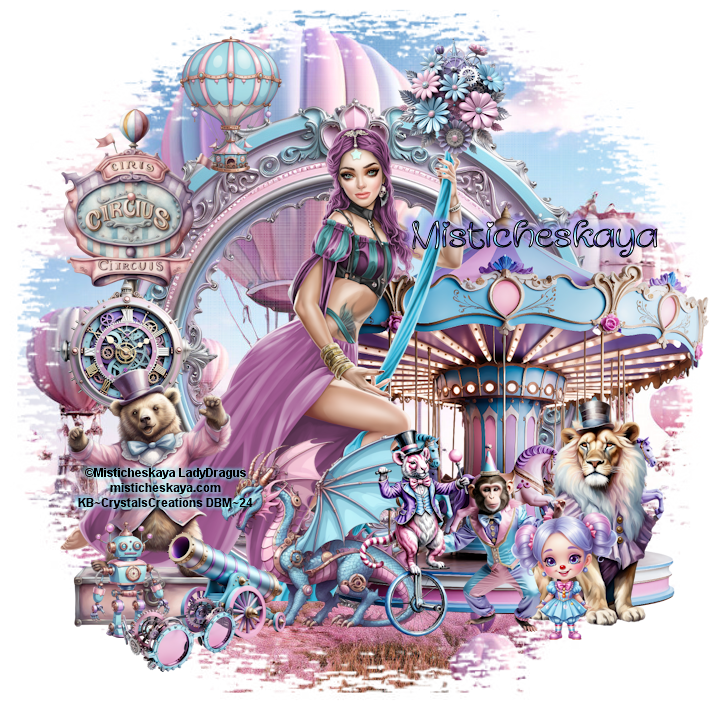
Welcome to the Circus

This tutorial is written in Corel 2023, but any version should work, this is written in hopes you have working knowledge of Paint Shop Pro or other graphics program… this is written by me, never meant to copy or look like your work…
I am using a PTU kit
By Crystals Creations
Called Dreamy Steampunk Circus

You can find all of her stores
I am using a PTU tube
By Misticheskaya
Called Ariel Gymnast

Here Aerial Gymnast
Horseplay pastures Mask 30
Open a 750x750 (you can size down at the end)
E5 c/p size this down by 53% pull to the far right edge of the frame
Open the tube we are using I colorized the gray scale layers to match the kit
Size her down by 25% pull so the top of the cloth is up on the right top edge of the frame
58 c/p size this down by 50% pull to the bottom of the tube
36 c/p size this down by 25% pull to the middle left of the frame
9 c/p size this down by 25% pull to cover up the bottom of the circus post
49 c/p size this down by 31% pull to sit in front of the carousel
39 c/p size this down by 27% pull to the far right edge of the tag
20 c/p mirror size it down by 27% pull in between the bear and dragon
28 c/p size this down by 22% pull so this covers up the top part of the cloth the tube is hanging on
2 c/p size this down by 35% pull to sit on the left edge of the lion
41 c/p size this down by 25% pull to sit in between the dragon and monkey
54 c/p size this down by 25% pull to stand on left side of the bear
59 c/p size this down by 30% pull to the upper left top of the frame
10 c/p size this down by 22% pull to sit on ground in front of the robot
13 c/p size this down by 25% pull to stand beside the lion
Click on bottom layer of your tag
Open paper 14 size this down to fit canvas of 710x710
Apply mask from above, merge into one raster.
Click on top most layer of your tag add a new raster for the credits and copyright information, add a saying to the tag and you’re done…
Thank you for reading my tutorial
©LadyDragus~ 2024
Tags for kit maker, mask maker and artist


Witch 3

This tutorial is written in Corel 2021, but any version should work, this is written in hopes you have working knowledge of Paint Shop Pro or other graphics program… this is written by me, never meant to copy or look like your work…
I am using a PTU kit
By Wicked Diabla
Called Witch 3

You can find it in her store
I am using a Pre-Paid tube
By Misticheskaya
Called Darra (you have had to pay into the project to get this tube)
You can find all of her tubes
Horseplay’s Mask 30
Here Masks
Open a 750x750
78 c/p size this down by 60%
34 c/p size this down by 50% pull to the right edge of your frame
55 c/p mirror size this down by 45% pull to the left edge of the frame
25 c/p size this down by 60% paste this 4 times to make it look like a floor of blue leaves
41 c/p size this down by 28% pull to sit on left edge of the frame
19 c/p size this down by 21% pull to sit in front of pumpkin with hands
Take the colorized tube (blue) paste her size her own by 25%
6 c/p size this down by 35% pull to sit by her feet
32 c/p size this down by 13% pull to sit by cauldron in the tube
22 c/p size this down by 13% pull to sit on left edge of the cat
30 c/p size the spider down by 13% pull to sit on top left rose on your tag
71 c/p size this down by 13% pull to sit on right of the cat
70 c/p size this down by 13% rotate 45° to the left pull to sit on top of the brim of her hat add a sharpen more to the element
67 c/p size this down by 13% pull to sit in front of the black cat
Click on bottom layer of your tag flood fill with paper 5 apply the mask from above, merge into one layer size it down by 90%
Click on top most layer of your tag
Add a new layer for the copyrights and credit to kit maker
Thank you for reading my tutorial
©LadyDragus~ 2023


Kit Match For


Stores I Sell At


Blog Trains for HODG





Forums


Blogs I follow


.gif)


















