My Blinkies :)



Creative Fabrica

Creative Teams






Artists and Store I like


















Showing posts with label KarmaMask. Show all posts
Showing posts with label KarmaMask. Show all posts
Nov 3, 2019
Autumn Comes

This tutorial is written in Corel X5, but any version
should work, this is written in hopes you have
working knowledge of Paint Shop Pro or other graphics program… this is
written by me, never meant to copy or look like your work…
I am using a PTU kit by
Creative Scraps by Crys
Called Autumn in the City

You can find it
I am using a PTU tube
By Verymany (Pics for design)
Here PFD~ Verymany ~
I am using a mask by Ashley
Karmalized Mask 007
Here Karmalized Kreationz
Open a 715x715
Frame 3 c/p size it down by 70%
E23 c/p pull behind the frame , then size it down by
70%, pull to the bottom inside of the frame
Click back on top layer of your tag
E21 c/p size it down by 50% pull to stand on left edge
of your tag
E3 c/p size the flower down by 36% pull to stand in front
of tree
E34 c/p size it down by 70% add this drop shadow
Vertical 5
Horizontal 3
Opacity 75
Blur 5
Color black
E16 c/p size it down by 52% pull to look like it is
climbing up the lamppost
E4 c/p size down by 45% pull to the lower left under
the lamppost
E2 c/p size it down by 41% pull to sit on bottom of
lamppost
E51 c/p mirror size down by 62% pull to the upper
right hand edge of your frame
Take the tube c/p her; then size the full size down by
35% pull her to sit on right hand edge of the frame
E5 c/p size the dog down by 45% pull to sit on right
of the tube
E19 c/p size down by 17% pull to sit by puddle of
water
E53 c/p mirror size down by 30% pull to sit on edge of
puddle
E17 c/p size the “doll” down by 24% pull to sit on far
right of the tag by dog
Go to bottom layer of your tag flood fill with paper1
apply mask from above, or one you like better , merge that into one group
layer…
Click on top most layer of your tag
E29 c/p leave as it falls on your tag
Add a new
raster layer for your copyrights and credit to kit maker add a saying to the
tag and you’re done.
©LadyDragus ~ October 31, 2019

Aug 2, 2019
Beach memories

This tutorial is written in Corel X5, but any version
should work, this is written in hopes you have
working knowledge of Paint Shop Pro or other graphics program… this is
written by me, never meant to copy or look like your work…
I am using a
PTU kit
By Desingz By Shelly
Called Ocean Memories

You can find this kit
Here Designz By Shelly
I am using a PTU tube
By Fiodorova Maria
I got this tube at Pics for design
Here PFD~Fiodorova Maria
I am using a FTU Mask
By Ashley of (Karma_007)
Open a 725x725
E115 c/p size down by 60%
E17 c/p size down by 55% pull to the lower left of
your frame…
Take the tube we are using c/p size her down by 30%
pull to the middle/right of the frame…
E6 c/p pull to the lower right of the tube…
E64 c/p pull it to the lower part of your tube…
E28 c/p size down by 30% pull to sit on right hand
edge of your tube, and then pull behind the heart made of sand…
Click on top layer of your tag…
E5 c/p size down by 18% pull to sit on the left of
rope…
E29 c/p rotate 90° to the left size down by 55% pull
down in front of box…
E56 c/p size down by 25% pull to the upper right of
your tag..
E55 c/p size down by 30% pull to fly under the other
bird…
E27 c/p size down by 30% pull to the far right of the
sand…
E23 c/p size down by 25% pull to sit on right end of
paddle…
E58 c/p size down by 25% pull to sit on top of the
rope…
E90 c/p size down by 25% pull to sit on the right of
the box…
Click on bottom layer of your tag flood fill with
paper 10 apply mask from above, merge into one raster layer…
Open E53 c/p size it down by 55% pull to the upper
left then c/p mirror and pull to the lower right of the tag…
Size the tag down to 700x700 pixels
Click on top most layer of your tag; add a new layer
for your copyrights for tube and kit if kit maker requires it..
Add a name or saying to your tag
Thank you for reading my tutorial
©LadyDragus~ August 1, 2019
Jun 26, 2019
Love is love

This tutorial is written in Corel X5, but any version
should work, this is written in hopes you have
working knowledge of Paint Shop Pro or other graphics program… this is
written by me, never meant to copy or look like your work…
I am using a wicked kit
By All Dolled Up & Help 4 Casper Group
I am also using the CU/PU tube that matches the kit
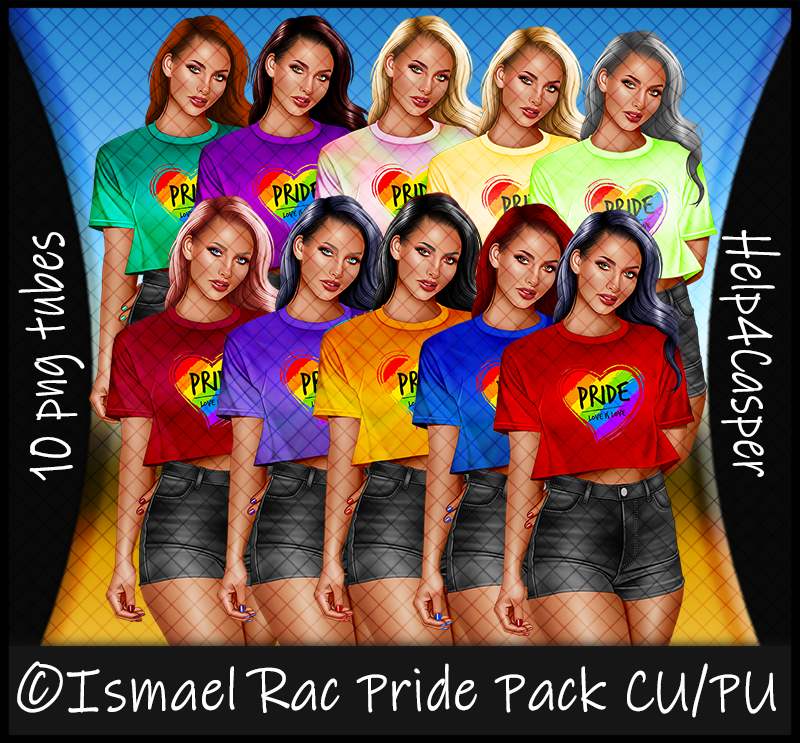
You can find all of Caspers Goodies
Here ~Help 4 Casper ~
Preview of the kit
I am using a FTU mask
By Karmalized (007)
Here Karmalized Kreationz
Open a 725x725
E121 c/p size it down by 75%
Take the tube you wish to use, if you only want to
make a half pic you can I just sized the full size version down by 32% pull the
frame down just a bit so she shows in the middle of the tag…
E11 c/p size down by 40% pull to cover up the bottom
part of the tubes legs…
E117 c/p size down it by 31% pull it to the lower left
hand side of your tag…
E14 c/p size it down by 55% pull to the upper right
hand edge of your tag…
E32 c/p size down by 25% pull to sit on left of the colored
ball…
E95 c/p size down by 33% pull to the right of sands of
time…
E113 c/p size down by 33% pull to cover up the string
on the balloons…
E125 c/p size down by 32% pull to sit at right edge of
flag…
E132 c/p mirror size down by 32% pull to the left of
blue flower…
E128 flip vertical mirror size down by 29% pull to sit
under the yellow and blue flowers…
E131 c/p mirror size down by 29% pull to the upper
right of blue flower…
E54 c/p size down by 35% pull to sit in front of hour
glass…
Click on bottom layer of your tag size it down to
700x700 (how ever you feel comfy doing this) flood fill with paper 4 apply mask
from above and merge into one layer…
Click on top most layer of your tag add a new raster
layer and add your copyrights, Make sure you have a Help 4 Casper LIC to use
this tube…
Thank you for reading my tutorial
© LadyDragus~ June 26, 2019

May 28, 2019


This tutorial is written in Corel X5, but any version
should work, this is written in hopes you have
working knowledge of Paint Shop Pro or other graphics program… this is
written by me, never meant to copy or look like your work…
I am using the PTU artwork
Of Rebecca Sinz
Using the tube
Pearl

You can find all of her artwork
Here Rebecca Sinz tubes
I am using a FTU kit
By Miz Teeques
*Diamond* which is part of her birthstone collection

You can find her kits
Here Miz Teeques
I am using a FTU mask
By Karmalized (mask4)
Open a 725x725 tag, we can size down at the end
Frame 3 c/p size down by 60%
Take the tube we are using paste it behind the frame,
then size down by 75% you can clean off any of the tube showing outside of the
frame…
Still on bottom layer of the tag,
E31 c/p size down by 60% pull the clock to the upper
right, where the left side is hidden, then take a 2nd copy of the
clock and pull it to the bottom left of your tag, where the right side is
hidden…
Click on top of the frame
E21 c/p size the star down by 45% pull to the lower
right hand edge of your frame…
E13 c/p size it down by 25% pull to the bottom left of
your frame…
E4 c/p size down it by 41%, then pull it to the middle
right of the bottom of the frame…
E7 c/p size the flower down by 24% pull to the upper
left top of the frame…
E9 c/p the flower, then size it down by 25% pull to
the left of the lamp…
E3 c/p pull to the bottom of white diamonds, then size
it down by 30% pull to the bottom of white diamonds…
E36 c/p mirror size the leaves down by 25% pull just
above the lantern on the left side of your tag.. .
E10 c/p the rose pull it to the right of lily, size it
down by 25%...
E53 c/p add this drop shadow to the element
Vertical 6
Horizontal 4
Opacity 75
Blur 10
Color black
Pull the word Aries, up to the upper right of the tag,
just above the clock…
Click on bottom layer of your tag size the tag down to
700x700
Flood fill with paper 5 apply mask from above, merge
into one raster layer add the same drop shadow from above...
Click on top most raster of the tag, add a new layer
for your copyrights and credit to kit maker , Make sure you have a license to
use Rebecca’s Art as it is required …
Thank you
©LadyDragus ~ May 28, 2019
Tags for Kit maker and mask maker


May 3, 2019
Mermaid Enchantment


This tutorial is written in Corel X5, but any version
should work, this is written in hopes you have
working knowledge of Paint Shop Pro or other graphics program… this is
written by me, never meant to copy or look like your work…
I am working with the PTU artwork
Of Charles Bristow

You can find all of his work
I am using a PTU kit
By Pink Paradox Productions

She sells in her store
I am using a FTU mask
By Karmlized_007
Open 725x725 tag(Size down at the end)
F1 c/p size it down by 45% leave it in the middle of
your tag…
E82 c/p size it down by 60% pull to the bottom edge of
the frame…
E139 c/p size down by 55% pull to the left hand edge
of frame…
E117 c/p size down by 40% pull to the far left hand
edge of the tag…
E6 c/p pull to the middle left of the frame…
E9 c/p size down by 31% pull to right edge of purple
plant...
E71 c/p size down by 33% pull to the bottom of the
frame…
E64 c/p size down by 25% pull to the left of the sea
shell..
Take your tube past her and size her down by 45% pull
to sit inside of the shell…
E5 c/p size down by 12% pull to sit on top of purple
shell…
E143 c/p size down by 30% pull to the right hand edge
of the frame…
E135 c/p mirror size the flower down by 35% pull to middle
of grass…
E60 c/p size down by 12% pull to sit on bottom of the
flower…
E47 c/p mirror size the mirror down by 40% pull to sit
by rock on right hand edge of your tag…
E31 c/p size down by 30% pull to sit on the mirror’s
handle…
E114 c/p size down by 15% pull to sit on the right
edge of shell…
Go to bottom layer of your tag flood fill with paper
19 apply mask from above or one you like better…
Go to top most raster of your tag make a new layer for
your copyrights and credit to kit maker…
Thank you for reading my tutorial
©LadyDragus~ May 3, 2019
Tags for Kit maker and Mask maker


Mar 26, 2019
Toxic Blue

This tutorial is written in Corel X5, but any version
should work, this is written in hopes you have
working knowledge of Paint Shop Pro or other graphics program… this is
written by me, never meant to copy or look like your work…
I am using a PTU kit
By Freeks Creations

You can find it in her stores
Here Mystical Scraps
&
Here Scraps and Company
I am using a PTU
Exclusive tube (LadyMishka)
This was bought
Here
I am using a FTU maks
By Karma (Karmalized_Mask001)
Here Karma Masks
Open a 725x725 size tag
Frame c/p size it down by 70%
Spiked ball c/p size down by 35% paste 3 of this in
different places on the frame, I did most of mine on the top …
Bow c/p size down by 50% pull to the middle spiked
ball to cover up the top of it…
Flowers 2 c/p size down by 50% pull to the upper right
hand edge of your frame, beside the bow…
Take the tube c/p mirror size her down by 20% pull to
the left side of your tag…
Drum c/p size down by 37% pull behind the tube by her
feet…
Plant c/p size down by 55% pull to the left hand edge
of the tube…
Poison2 c/p size down by 37% pull to sit on right side
of plant…
Poison c/p size down by 37% pull to the right of other
Poison2
Snake c/p size down by 32% pull to sit on top of
barrels…
Snake2 c/p size down by 50% pull to sit in front of
the tube…
Vile c/p size down by 30% pull to sit in front in
plant…
Vile 2 c/p rotate 90° to the right size it down by 35%
pull in front of the bottles…
Sparkles c/p pull so it covers some of the tube…
Click on bottom layer of your tag flood fill with
paper5 apply mask from above, merge into on raster layer..
Click on top most layer of your tag, add a new raster
layer for the copyright and credit to the kit maker if they require it…
Thank you for reading my tutorial
©LadyDragus~ March 2019
Mar 25, 2019
She’s a Bad Girl

This tutorial is written in Corel X5, but any version
should work, this is written in hopes you have
working knowledge of Paint Shop Pro or other graphics program… this is
written by me, never meant to copy or look like your work…
I am working with a kit
By Joyful Kreationz
Dark Beauty

You can find this in her stores
I am using the PTU
Artwork of The Hunter

You can now find his tubes
Here The Hunter Tubes
I am using a FTU maks
By Karma (Karmalized_Mask007)
Here Karma Mask
Open a 725x725 size tag
Frame4 c/p size it down by 80%
Take the full size tube, c/p size her down by 35% pull
to the bottom edge of the frame…
E10 c/p size it down by 85% pull to the right hand
edge of your frame
E66 c/p pull down to the bottom edge of your tube…
E60 c/p size down by 46% pull to the lower left of
your tag.. .
E53 c/p size down by 55% pull to the lower right hand
edge of your tube…
E46 c/p size down by 55% pull to cover up the bottom
of the tube…
E59 c/p size down by 35% pull to the far right of
buildings…
E54 c/p size down by 16% pull to the right of the
bottle…
E52 c/p size down by 37% pull to the middle of
buildings…
E42 c/p size down by 35% pull to stand on the left
side of the car…
Click on bottom raster layer, re-size your tag so it’s
700x700 or smaller if you need it…
Flood fill bottom layer with paper 9 apply mask from
above merge into one raster layer..
Click on top most layer of your tag add a new raster
layer for your copyright and credit to kit maker …
Thank you for reading my tutorial
©LadyDragus ~ March 2019
Feb 9, 2019
Kisses Like Candy 1

This tutorial is written in Corel X5, but any version
should work, this is written in hopes you have
working knowledge of Paint Shop Pro or other graphics program… this is
written by me, never meant to copy or look like your work…
I am using Freeks Creations part of the
Kisses Like Candy Collab

You can find it
I am using a tube by
Fidorova Maria (This is a Quest reward)
You can find all of her work
Here PFD~ Fidorova Maria
I am using a FTU mask
By Ashely of Karmlized Creations *Karmalized_008*
Masks Karmalized Blog~Masks
Open a 725x725 (size down at end)
Frame2 c/p size down by 70%
Flower2 c/p size down by 61% pull to the left edge of
frame…
Tree c/p size it down by 80% pull to the right hand edge
of the frame…
Take the tube your using and paste her size her down
by 25% pull to the middle of the frame…
Flower Box c/p size down by 50% pull to sit at bottom
of tube…
Chocolate box c/p mirror size down by 29% pull to sit
in front of unicorn…
Cupcake c/p size down by 25% pull to sit on flower
box…
Gift c/p size it down by 20% pull to the left hand
edge of your tag…
Balloons c/p size down by 31% pull to float above
heart box on left side of tag…
Love Potion c/p size down by 35% pull to sit on left of
chocolate box…
Bon Bons c/p mirror size down by 22% pull to sit on
right of love potion..
Glass c/p size it down by 31%; then pull it to sit on
left of cupcake on flower box…
Click on bottom layer of your tag flood fill with
paper2 apply mask from above , merge into one raster layer
Click on top most layer of your tag, make a new raster
layer for your copyright and credit to kit maker, add a saying and you’re done…
©LadyDragus~ February~2019
Tag for mask maker Karma

Sep 13, 2018
A Haunting we will go !


This tutorial is written in Corel X5, but any version
should work, this is written in hopes you have
working knowledge of Paint Shop Pro or other graphics program… this is
written by me, never meant to copy or look like your work…
I am using PTU
kit
By Freeks Creaitons
Called
Haunted Farm

You can get it
Here Freeks Creations
I am using the adorable artwork
Of Kajenna
Here PFD~ Kajenna
I am using a FTU mask
By Karma (001)
Here https://karmazkreationz.blogspot.com/
Open a 725x725 (we’ll size down at the end)
Grass c/p pull just a little closer to bottom of the
tag space…
Fence c/p pull behind the grass re-size it by 90%
Cornstalk2 c/p pull behind the grave, re-size it by
70%...
Click on top layer
Grave c/p re-size by 25% pull to the right hand edge
of the grass…
Grass 2 c/p re-size by 37% pull to the right edge of
the grave; then c/p mirror pull to the left edge of the grave…
Bush c/p mirror re-size by 60% pull to the left edge
of the grass, some will hang over the grass…
Tree c/p re-size by 65% pull to stand in front of the
bush..
Take the kitten tube c/p re-size it by 20% pull to the
middle of the tag…
Wagon2 c/p re-size by 35% pull to sit on left of tube…
Child2 c/p mirror re-size by 35% pull to the right of
your tube…
Ghost2 c/p re-size by 25% pull to sit on the right of
his hat…
Child c/p mirror re-size by 30% pull him in front of
wagon with pumpkins...
Leave2 c/p re-size by 50% pull one to the right hand
side of your tag, c/p 2 more times one on the left and the last in the middle
of the leaves…
Bird2 c/p re-size by 28% pull to sit by the child on
the right of the tag…
Cat c/p re-size by 28% pull to sit on left hand edge
of the tag…
Pumpkin2 c/p re-size by 25% pull to right edge of your
tag…
Click on bottom layer of your tag
Silo c/p re-size by 75% pull to the left end of the
fence…
Click on bottom layer flood fill with paper4 apply
mask from above, merge into one raster layer, up-size it by 105% then add a
sharpen to the layer..
Go to the top most layer of your tag, add a new raster
layer for your copyrights and credit’s to kit maker …
Thank you for reading my tutorial
© LadyDragus ~ September 2018

Aug 13, 2018
Adventure Time

This tutorial is written in Corel X5, but any version
should work, this is written in hopes you have
working knowledge of Paint Shop Pro or other graphics program… this is
written by me, never meant to copy or look like your work…
I am using a PTU kit
By Freeks Creations
Called
Jungle Adventure

You can find this kit in her stores
Here
&
I am using a PTU tube
By Arthur Crowe
Called Sweet Ger

You can find this tube
Here ~Sweet Ger ~
I am using a FTU mask by
Ashely (007)
Here Karma Blog
Open a 725x725
Arch c/p leave as it falls…
Vines c/p mirror pull to the top of the arch…
Flower2 c/p re-size by 10% pull to sit on the vine at
the end…
Statue2 c/p mirror re-size by 50% pull to the left
side of arch…
Tree2 c/p pull it to the left edge of arch…
Snake c/p mirror pull behind the tree re-size by 48%
pull to sit on the top inside of the arch…
Take the tube c/p re-size him down by 16% pull to the
middle of the arch…
Bush2 c/p re-size by 40% sit at bottom of the tree…
Bush c/p re-size by 40% pull to the right of the arch…
Bush3 c/p re-size by 25% pull to the right of tree…
Adventure girl c/p re-size by 70% pull to the right of
the tube…
Adventure Native c/p re-size by 67% pull to the left
of the tube…
Lizard c/p re-size by 52% mirror pull to stand in
front of girl…
Fence c/p re-size by 90% pull to the bottom of the
tag…
Parrot c/p re-size by 25% pull to sit on the far right
hand edge of the fence…
Click on bottom layer of your tag
Open the paper titled Background and c/p it as the
bottom layer apply the mask from above…
Now click on top most layer of your tag, add a new raster layer for the tag for your copyrights and credit info...
Thank you for reading my tutorial
©LadyDragus~ August 2018
Subscribe to:
Posts
(Atom)
Kit Match For


Stores I Sell At


Blog Trains for HODG





Forums


Blogs I follow


.gif)


















