My Blinkies :)


Creative Fabrica

Artists & Stores


Blogs I follow


One Last Night

This tutorial is written in Corel 2021, but any version should work, this is written in hopes you have working knowledge of Paint Shop Pro or other graphics program… this is written by me, never meant to copy or look like your work…
I am using a PTU kit
By Irish Princess Designs
Called One Last Night

You can find her kits
I am also using a PTU tube
By Vi Nina
Called New Year

You can find this tube
RD mask 163 Mask1
Open a 750x750
Frame 6 c/p size this down by 54%
25 c/p pull behind the frame size it down by 40% pull up to the top of the frame
Click on top most layer of the tag
26 crop out just the black bow paste as a new layer then size it down by 26% pull to the upper right
4 c/p size this down by 26% pull to the upper right on top of the black bow
104 c/p size this down by 25% pull to the upper left edge of your frame
47 c/p pull to the top left of your tag size it down by 20% then pull 104 down so it looks like it is hanging off the bottom of the clock
Take the tube we are using c/p size her down by 32% pull to the middle of your frame
107 c/p size this down by 22% pull to the far right of your frame
39 c/p size this down by 21% pull to sit by candle in the lamp
31 c/p size this down by 13% pull to sit in front of candles
41 c/p size this down by 16% pull to sit on left edge of the tag
51 c/p size this down by 16% pull to the bottom of your tube
153 c/p size this down by 14% pull to sit in front of boxes
11 c/p size this down by 12% pull to sit on right edge of the other hats
144 c/p size this down by 12% pull to sit by other ornaments in front of the candles
52 c/p size this down by 15% pull to sit in front of hats
174 c/p size this down by 15% pull to sit in front of baubles in the bowl
61 c/p size this down by 15% pull to hang on top of the watch
185 c/p size this down by 15% pull to the upper left edge of the balloons on left side of the tag
133 c/p size this down by 70% pull a copy to the top of the tag and a 2nd copy to the bottom of the tag
Click on bottom layer of your tag flood fill with paper7 apply mask from above, merge into one raster layer…
Click on top layer of your tag add a new raster for the copyrights and credit to kit maker add a saying to the tag and you’re done…
Thank you for reading my tutorial
©LadyDragus~ 2023
Show off for the cluster frames
**Remember that Kate does not allow FTU clusters made with her kits**


Pink Chocolate

This tutorial is written in Corel 2021, but any version should work, this is written in hopes you have working knowledge of Paint Shop Pro or other graphics program… this is written by me, never meant to copy or look like your work…
I am using a PTU kit
By House of Dragus Graphics
Called Pink Chocolate

You can find it
here House of Dragus Graphics
I am using a PTU tube
By Keith Garvey

Here Keith Garvey 336-2
Open a 750x750
Frame 168-12 c/p size this down by 75%
Take the close up of tube (layer 3) c/p size her down by 65% pull to sit on middle of the frame
6 c/p size this down by 35% pull to the upper left, the next element will cover up the strings
15 c/p mirror size this down by 60% pull to the left edge of the tag
39 c/p size this down by 35% pull to sit on bottom of bear N flowers
75 c/p mirror size this down by 23% pull to sit on left edge of pink flowers
103 c/p rotate 45° to the left size down by 35% pull to right edge of the frame
1 c/p size this down by 29% pull to the upper right top of frame
77 c/p size this down by 16% pull to the top right of the frame
19 c/p size this down by 30% pull to the middle of the tag
47 c/p size this down by 15% pull to sit on right of yellow rose
62 c/p size this down by 15% pull to sit on end of rose’s in paper
104 c/p size this down by 15% pull to sit on right edge of chocolate Heart
11 c/p size this down by 15% pull up to the right of brown ribbon w/hearts
5 c/p size this down by 15% pull to sit on left side of other cake
22 c/p size this down by 15% pull to sit on right edge of chocolate rose
24 c/p size this down by 16% pull to sit on top of red and brown flowers
117 c/p size this down by 16% pull to the far right edge of the tag
Click on bottom layer of your tag (this is where I size it down
Open paper 3 using your rectangle tool draw one behind the frame, convert to a raster layer. Click on top most layer of your tag add a new layer for the copyrights for tube and kit, and add a saying to the tag and you’re done…
Thank you for reading my tutorial
©LadyDragus~ 2023
Cluster Show off and Banner


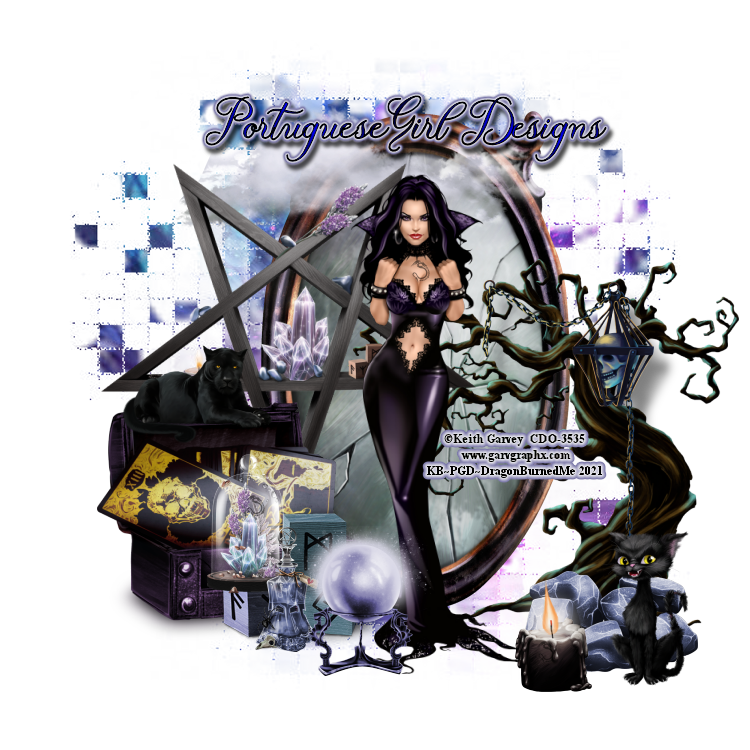
Welcome to the Dark Side

This tutorial is written in Corel 2021, but any
version should work, this is written in hopes you have working knowledge of Paint Shop Pro or other
graphics program… this is written by me, never meant to copy or look like your
work…
I am using a PTU kit by
PortugueseGirl Designs

She sells at many stores
I am using the PTU artwork
Of Keith Garvey (152-1)

You can find this tube
Here Keith Garvey 152-1
I am using a mask by Vix (364)
Here Vix PSP
This is her new site
Make a 750x750
E76 c/p leaves in the middle of your tag
E55 c/p size it down by 65%; then pull this to the
right edge mirror
E79 c/p size this down by 45% pull so it hangs off the
top left branch
Add this drop shadow
Vertical 17
Horizontal 15
Opacity 50
Blur 14
Color black
E114 c/p pull to the top of the mirror
E12 c/p size down by 75% pull to hang in the left
middle side of the mirror
E30 c/p size this down by 55% pull to the far left of
the mirror
E113 c/p size the black cat down by 25% pull him so he
is lying on top of the box
Take the version of the tube w/out the shawl, paste
her and size her down by 80% pull to stand by the tree
E11 c/p pull blocks to the left side of Mirror
E32 c/p size the rocks down by 30% pull to sit in
front of tree
E14 c/p size down by 30% pull to sit on left block
E35 c/p size it down by 25% pull this bottle to sit in
front of the blocks
E58 c/p the candle size it down by 25%pull so it sit
in front of the rocks
E46 c/p size this globe down by 25% pull to sit in
front of your tube
E49 c/p size this cat down by 31% pull to the right of
the black candle
Click on bottom most layer of your tag flood fill with
paper 4 apply mask from above, merge it into a raster layer..
Click on top most layer of your tag make a new raster
layer for the credit to tube artist and kit maker , add a saying to your tag
and you’re done …
Thank you for reading my tutorial
©LadyDragus ~ July 2021
Tags for kit maker artist and mask maker


Blushing Blues PTU Cluster Show off


Stores I Sell At


All of my older kits are here Kits and Clusters Sold Separately

Forums

Blog Trains for HODG


Creative Teams