My Blinkies :)



Creative Fabrica

Creative Teams









Artists and Store I like

















Onyx Witch

This tutorial is written in Corel 2023, but any version should work, this is written in hopes you have working knowledge of Paint Shop Pro or other graphics program… this is written by me, never meant to copy or look like your work…
I am using a PTU kit
By Irish Princess Designs
Called Enchanted Onyx

You can get this kit
Here Enchanted Onyx
I am using a PTU tube
By Jenny
I am using the extended version of this tube

Here Ella Tube
Here
I am using AROK_Mask 275
Here AORK~ Masks
Open a 750x750 size tag
Frame 2 c/p size this down by 52%
Take the colorized tube we are using, c/p size her down by 15% pull to the middle of the frame
23 c/p mirror then size this down by 22% pull to the bottom left of your tube
143 c/p rotate 45° to the left then size it down by 22% pull to sit behind the flowers
21 c/p size this down by 22% pull to the middle bottom of your tube
Click on top most layer of your tag
6 c/p size this down by 42% pull to the far right edge of the tag
184 c/p size this down by 25% pull to stand on the stairs
37 c/p size this down by 16% pull to sit on bottom left of the stairs
95 c/p mirror size this down by 15% pull to stand below big horse
68 c/p size this down by 15% pull to the very far left of your tag
80 c/p size this down by 15% pull to the right of golden globe
9 c/p size this down by 17% pull to the middle of the tag
42 c/p size this down by 12% pull to sit by the small unicorn
76 c/p size this down by 14% pull to sit on right of the candle
41 c/p size this down by 10% pull so it is sitting in front left of the caldron
44 c/p size this down by 13% pull to sit on left of the clock
75 c/p size this down by 13% pull so it sits in front of the small house
Click on bottom layer flood fill with paper 18,then apply the mask from above, merge into one layer, then click on top most layer of your tag for your credit, and a name on the kit, you’re done…
Thank you for reading my tutorial
©LadyDragus~ 2025
one for the mask maker


** when showing off a tag you make with this tutorial
only use the copyright for the tag you are using and credit to the kit maker,
Never put copyright and my tutorial link, this is against any artist TOU

Vampire Bride
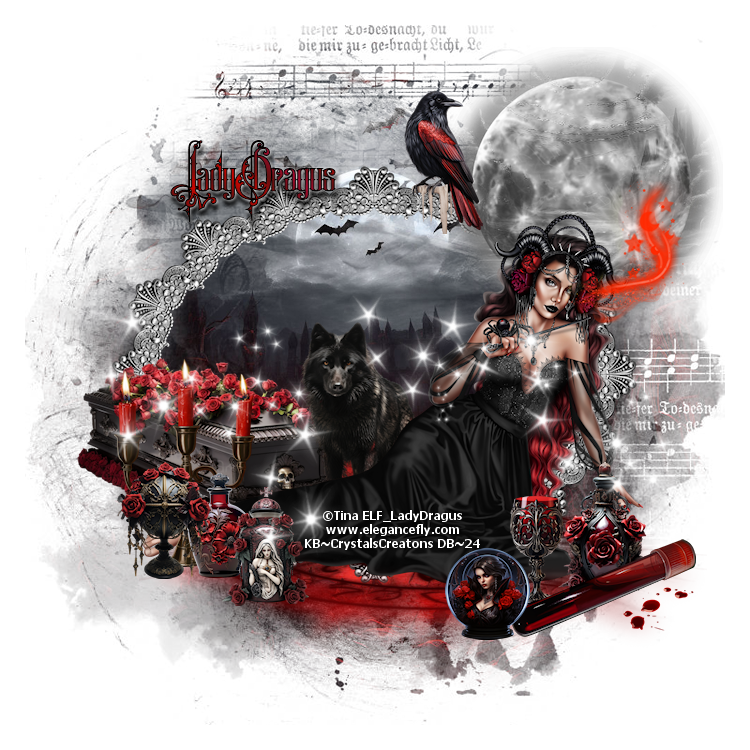
This tutorial is written in Corel 2023, but any version should work, this is written in hopes you have working knowledge of Paint Shop Pro or other graphics program… this is written by me, never meant to copy or look like your work…
I am using a PTU kit
By
Called Vampire Kisses

You can find all of stores
I am using a PTU tube
By Tina
Called Cora (I’m using the extended Version)

AROKmask 104
Open a 750x750
E30rotate 90° to the right, then size it down by 66%
E38 c/p size this down by 50% pull to the far left edge of the frame
E42 c/p mirror size the wolf down by 40% pull to stand on right side of the coffin
E35 c/p size this down by 50% pull to the upper right hand edge of the frame
Take the colorized tube we are using, c/p size her down by 19% pull to the bottom of the frame (her head will sit on bottom of the moon)
E23 c/p size this down by 30% pull to sit on left edge of the moon
E10 c/p size this down by 30% pull to the right edge of the tube
E24 c/p size this down by 24% pull to sit on left edge of the bottle
E9 c/p size this down by 30% pull to sit in front of the bottle
E36 c/p size the candles down by 30% pull to the left edge of the tube
E19 c/p size this down by 25% sit on right edge of the candles
E14 c/p size this down by 25% pull to sit by candles
E18 c/p size this down by 20% pull to sit on left edge of the vial
E13 c/p size this down by 25% pull to sit on bottle by candles
52 c/p pull just a bit down toward the bottom right,
Click on bottom layer of the tag
Take paper8 size it down to 700x700 in size paste it as a new layer, then apply the mask from above, merge into one layer.
Click on top most layer of your tag add a new raster for the copyrights and credit to kit maker, then add a saying to the tag and you’re done…
Thank you for reading my tutorial
©LadyDragus~2024

Mardi Gras

This tutorial is written in Corel 2021, but any version should work, this is written in hopes you have working knowledge of Paint Shop Pro or other graphics program… this is written by me, never meant to copy or look like your work…
I am using 2 PTU kits by
Carita Creationz
One is Mardi Gras (revamped),the 2nd one is Mardi Gras queen


You can find this combo
Here
I am also using a PTU CU/PU tube
Called Mardi

You can find her
Here Mardi Tube
AKK=Mask 110
MG= Mardi Gras
MQ=MardiGrasQueen kit
MG-21 c/p size this down by 65% leave as it falls on the tag
Take the tube we are using c/p size her down by 35% pull to the bottom of your frame
MQ-2 c/p size this down by 46% pull to the lower left edge of the tube
MG-6 rotate 90° to the right pull to sit in the middle of the green ribbon
MG-25 c/p size this down by 51% pull to the far right of the green ribbon
MG-27 c/p size this down by 46% pull to the far right edge of the frame
MG-9 c/p size this down by 39% pull to sit on the top of golden ribbon
MG-23 c/p size this down by 35% pull to sit in the middle of the yellow beads
MG-5 c/p size this down by 35% pull to the left edge of purple flower
MG-e1b c/p size this down by 35% pull to sit on the bottom of purple flower
MQ-40 c/p mirror size this down by 35% pull to the lower right of the tubes hair
MQ-4 c/p size this down by 29% pull to the middle of the tag
MQ-39 c/p size this down by 29% pull to sit on left edge of green mask
MG-26 c/p size this down by 29% pull to sit on lower right of the aqua colored flower
MG-33 c/p size this down by 25% pull to sit on right edge of cake
MQ-21 c/p size this down by 26% rotate 45° to the right then pull to the middle of the frame on the left side
MQ-37 c/p size this down by 20% pull to sit in between the green and aqua flowers
MQ-38 c/p size this down by 20% pull to sit in front of jar with beads on right side of your tag
MQ-1 c/p size this down by 20% pull to sit on left edge of green cupcake
MQ-20 c/p size this down by 15% pull to sit in front of green cupcake
MQ-30 c/p size this down by 20% pull to sit on top of the green and blue/green rose
MQ-11 c/p size this down by 15% pull to sit on left of rainbow cupcake
Click on bottom layer of your tag flood fill with MG-Paper2b apply mask from above, merge into one raster layer. Then size the layer down by 85%
Click on top most layer of your tag add a new layer for the copyrights and credit to the kit maker, do not add a copyright symbol to the tube as it’s not allowed, add a saying to the tag and you’re done…
©LadyDragus~2024
Tag for Kit maker & mask maker


Rusted

This tutorial is written in Corel 2021, but any version should work, this is written in hopes you have working knowledge of Paint Shop Pro or other graphics program… this is written by me, never meant to copy or look like your work…
I am using a PTU kit
By Irish Princess Designs
Called Rusted Turquoise

You can find her kits
Here https://payhip.com/IrishPrincessDesigns
I am using a PTU tube
By Mistichekaya
Called Mona

Arokmask109
Here Tuts By Renee`
Open a 750x750
Frame 4 c/p size this down by 50%
6 c/p size this down by 60%, then pull it to the right edge of your frame
84 c/p size this down by 20% pull to lie in front of the bottom of the steps
Take the colorized part of the tube we are using, paste her size her down by 26% mirror her and paste her w/the dragon on the left of the steps
66 c/p size this down by 21% pull to sit on left edge of the tube
21 c/p mirror size this down by 13 pull to the middle of the steps
118 c/p size this down by 15% pull to the right edge of your tag
42 c/p size this down by 12% pull to sit on right edge of the pumpkin in front of the tube
81 c/p mirror size this down by 15% pull to sit by basket of pumpkins
170 c/p size this down by 19% pull to sit by fox
8 c/p size this down by 14% pull to the far left edge of the pumpkins
74 c/p mirror size this down by 14% pull to sit on right of the lamp
Click on bottom layer of your tag
Open paper 12 size this down to 710x710 paste as a new layer apply mask from above, merge that into one layer, then size it down by 80%
Click on top most layer of your tag add a new raster layer for the credits and copyright information, add a saying to the tag and you’re done…
Thank you for reading my tutorial
©LadyDragus~2023
Preview of the Cluster frames


Northern Outdoors

This tutorial is written in Corel 2021, but any version should work, this is written in hopes you have working knowledge of Paint Shop Pro or other graphics program… this is written by me, never meant to copy or look like your work…
I am using a PTU kit
By Carita Creationz
Called Northern holiday

I am using a tube by
Alehandra_Vanhek
Called Anabel

AoRK Mask 110
Here Tuts by Rene`
Open a 750x750
10 c/p size this down by 51%
49 c/p size these down by 50% pull behind the frame
Take the colorized version (blue) we are using from the tube c/p size her down by30% pull to sit on left edge inside of the frame
26 c/p mirror size this down by 40% pull to the middle of the frame on right edge
43 c/p size this down by 10% pull to sit on the tree limb
4 c/p size this down by 65% pull the lower right edge of the frame (this will cover the very edge of the tube and the tree limb bottom)
2 c/p mirror size this down by 14% pull to stand in front of the house on the snow
20 c/p size this down by 27% pull to the bottom left edge of the tube
16 c/p size this down by 13% pull to stand by the moose
30 c/p size this down by 15% pull to stand on left of snowman
18 c/p size this down by 15% pull to stand on left edge of the fence
22 c/p size this down by 15% pull so the bear stand’s in between the fence on the house.
23 c/p size this down by 15% pull so he is standing on the snow covered rock
25 c/p size this down by 15% pull to sit on left side of the snow covered rock
34 c/p size this down by 10% pull to stand on the left side of snow covered rock
32 c/p size the dog down by 12% pull to sit on right side of the girl
6 c/p size this down by 13% pull to stand on right side of other teddy bear in coat
27 c/p size this down by 13% pull to sit on ground if front of the snowman
38 c/p size this down by 13% pull to stand on left of other gnome
7 c/p size this down by 10% pull to sit beside the moose and doggie
9 c/p size this down by 12% pull to sit on left edge of snowballs
13 c/p size this down by 10% pull to sit on right side of snowballs
Click on bottom layer of your tag open paper 9 flood fill bottom layer, apply mask from above, merge into one group.
Click on top most layer of your tag add a new raster layer, for the copyrights and credit to kit maker, add a saying to the tag and you’re done…
Thank you for reading my tutorial
©LadyDragus~ 2023

Just a little Witchy

This tutorial is written in Corel 2021, but any version should work, this is written in hopes you have working knowledge of Paint Shop Pro or other graphics program… this is written by me, never meant to copy or look like your work…
I am using a PTU kit
By Wicked Princess Designs
Just a Little Witchy

You can find all of her kit
Here Wicked Princess Scraps~ PayHip
&
I am also using the matching tube
By Katharine
Called Sweet_Witch

You can find her tubes
Here VeryMany Artist
AORK Mask17
Open a 750x750
E1 c/p size this down by 60%, take a 2nd copy of the frame paste then size this down by 65%
34 c/p size this down by 45% pull to the upper left corner of the frames
43 c/p size this down by 30% pull to the lower right edge of the tag
42 c/p size this down by 45% pull to the upper right edge of your tag
Take the red color of the tube we are using c/p size her down by 25% pull to the middle of the frames
74 c/p size this down by 33% pull to sit on left edge of the tube
45 c/p size this down by 30% pull this to sit on top of books
99 c/p size this down by 25% pull to sit on the right edge of the tube
96 c/p size this down by 25%, and then pull to the far left side of the tag
37 c/p mirror size this down by 25% pull to the right edge of books
7 c/p size this down by 20% pull to the left side of the tag
5 c/p size this down by 24% pull to the left edge of white & red rose
81 c/p size this down by 17% pull to sit in front of rose with the eye in it
14 c/p size this down by 17% pull to sit on right of mystic ball
132 c/p size this down by 20% pull to sit in front of our tube
138 c/p size this down by 20% pull to sit on the far left of white/red rose
50 c/p size this down by 20% pull to lay on top of the 3 wallets on right side of the tag
Click on bottom layer of your tag, open paper 2 size this down to fit inside of your canvas, apply the mask from above
Merge this into one layer (this is where you should size this down to what size you wish the tag to be) normally 700x700
Thank you for reading my tutorial
©LadyDragus~ 2023
Tag for Wicked Princess and Artist


Lemon

This tutorial is written in Corel 2021, but any version should work, this is written in hopes you have working knowledge of Paint Shop Pro or other graphics program… this is written by me, never meant to copy or look like your work…
I am using a PTU kit
By Irish Princess Designs
Called Lemonberry Swirl

You can find her kits
I am using an exclusive tube
By Misticheskaya
(This is still in the catalog) this can be bought at a slightly higher price than normal tubes
Called Danielle

You can find her
here SDanielle.
AoRK Mask 265
Open a 750x750
Frame 1 c/p size this down by 50%
136 c/p size this down by 55% pull to the middle top of the frame
55 c/p size this down by 50% pull to the left edge of the tag
187 c/p mirror size this down by 34% pull to the right edge of your tag
144 c/p size this down by 14% pull to the far right edge of the strawberries
Take the colored version of the tube you want to use, (also shake) c/p size her down by 19% pull to the middle of the tag
15 c/p size this down by 12% pull to sit by her arm on the blanket
25 c/p size this down by 14% pull to sit on right of her shake
42 c/p size this down by 14% pull to sit on left side of pie
17 c/p size this down by 9% pull to sit by lemon cake
78 c/p size this down by 10% pull to sit by lemon
33 c/p size this down by 11% pull to sit by lemon cake
9 c/p size this down by 7% pull to sit by lemon cupcake
60 c/p size this down by 11% pull to sit on left of strawberry slice of cake
199 c/p size this down by 11% pull to the end of the blanket that the tube is laying on
23 c/p size this down by 11% pull to sit on left of strawberry drink
67 c/p size this down by 7% pull to sit in middle of your tag
137 c/p size this down by 11% pull to sit by sunflowers
Click on bottom layer of your tag flood fill with paper 13 apply mask from above, merge into one layer.
Click on top most layer of your tag add a new raster layer for the copyrights for tube and kit maker if she requires this, add a saying to the tag and you’re done…
Thank you for reading my tutorial
©LadyDragus~ 2023
Show off with the cluster frames


Love in Cold Blood

This tutorial is written in Corel 2021, but any version should work, this is written in hopes you have working knowledge of Paint Shop Pro or other graphics program… this is written by me, never meant to copy or look like your work…
I am using the PTU artwork
Of Rebecc Sinz with her new tube
Love in Cold Blood

You can find this tube
Here Love In Cold Blood
I am also using a PTU kit
By Irish Princess Designs
Called Cold Bloody Rose

You can find this in all of her stores
Font: DreamScar
AORK Mask 106
Open a 750x750
Frame 7 c/p size this down by 51%
3 c/p size this down by 25% pull to hang on the right edge of the frame
Take tube 2 (close up) size her down by 55% pull to sit inside of the frame
146 c/p size this down by 49% pull to the bottom edge of the tube
10 c/p size this down by 40% pull to the bottom of the tag
36 c/p size this down by 25% pull to the right edge of flower
81 c/p size this down by 25% pull to the far right edge of the tag
42 c/p size this down by 25% pull to the left edge of the tag
199 c/p size this down by 15% pull to sit in front of gargoyle
80 c/p size this down by 20% pull to sit on right of roses
WA 3 c/p size this down by13% pull to sit in front of roses
4 c/p size this down by 14% pull to sit on right of dragon on right side of the tag
168 c/p size this down by 10% pull to sit on right edge of dragon on left side of the tag
167 c/p size this down by 10% pull to left edge of the dragon
192 c/p rotate 90° to the left then size it down by 16% pull to sit in front of chess pieces
73 c/p size this down by 13% pull to the middle bottom of your tag
Click on bottom layer of the tag
Open paper 3 size this down to 700x700 paste as a new layer, apply mask from above, merge this into one group layer
Click on top most layer of your tag add a new raster layer for the credit for artist, make sure you have a valid License to use her artwork, add a saying to the tag and you’re done…
Thank you for reading my tutorial
©LadyDragus~ 2023
Tag for Rene "Gizzy"

Kit Match For


Stores I Sell At


Blog Trains for HODG






Forums


Blogs I follow



.gif)