My Blinkies :)



Creative Fabrica

Creative Teams









Artists and Store I like

















Midnight rose

This tutorial is written in Corel 2021, but any version should work, this is written in hopes you have working knowledge of Paint Shop Pro or other graphics program… this is written by me, never meant to copy or look like your work…
I am using a PTU kit
By Honored Scraps sold at CDO
Called Midnight Rose
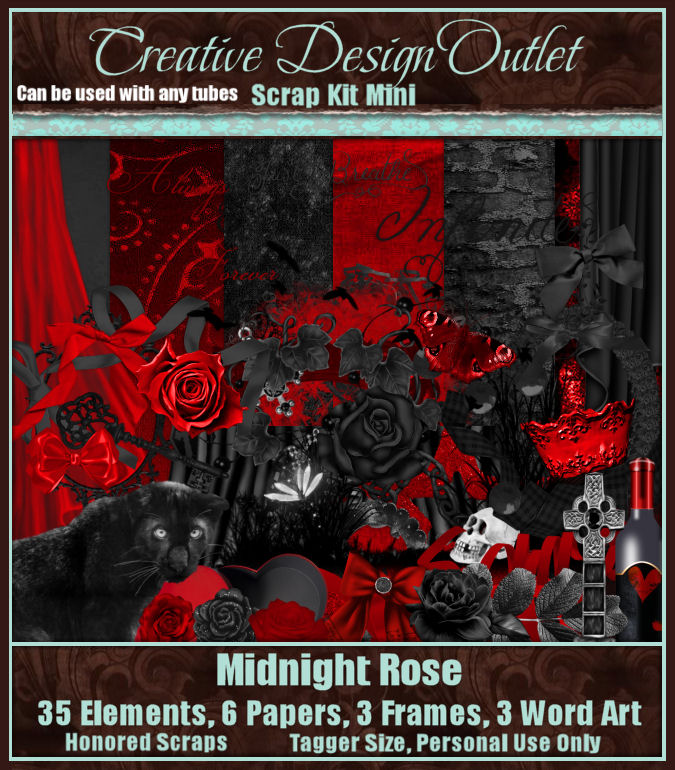
You can find the kit
Here Midnight Rose Mini
I am using a Christmas tube
By Nocturne in red it’s called Santa Baby

You can find this tube
Here Nocturne Santa Baby
Open a 750x750
Frame 3 c/p size this down by 57% rotate 90° to the right
Take the colorized version of the tube you want to use, c/p size her down by 35% pull to the bottom of the frame
11 c/p pull to the bottom of the frame, in front of the tube
10 c/p rotate 90° to the right then size it down by 49% pull to make it craw up her leg
19 c/p size this down by 44% pull to the far right edge of your tag
25 c/p size this down by 45% pull to the far left edge of the tag
20 c/p size this rose down by 26% pull to sit on right side of black rose
23 c/p size the sparkle rose down by 25% pull to sit on left edge of red rose
22 c/p size this down by 19% pull to sit on bottom of the cross
21 c/p size this rose down by 22% pull to the right of red rose on the cross
35 c/p size this down by 40% pull to the middle bottom of the tag
26 c/p size this down by 40% pull to sit at the bottom of the rose’s on the left side of your tag
Click on bottom layer of your tag
14 c/p pull to the upper left of the frame, c/p a 2nd copy flip and pull to the lower right of the frame (this is our paper)
Click on top most layer of your tag add a new raster layer for the credits and license information, add a saying to the tag and you’re done…
©LadyDragus~ 2023
Show off of the other tags I made with this



Beach Girl
A Timeline banner Tutorial

This tutorial is written in Corel 2021, but any version should work, this is written in hopes you have working knowledge of Paint Shop Pro or other graphics program… this is written by me, never meant to copy or look like your work…
I am using a PTU kit
By Honored Scraps
IB-Caron Vinson 79-2

You can find it
Here IB-Caron Vinson 79-2
I am also using the tube
By Caron Vinson

Here Caron Vinson 79-2
Font: Ladybug (PTU Creative Fabrica)
Open a 940x350 (banner size)
Flood fill bottom layer with paper 2
E5 c/p as a new layer, c/p a 2nd copy mirror this and pull to match the other side of the sand merge this into on layer
10 c/p size this down by 75% pull to the middle left of the tag, clean out any sand that is behind the “window”
9 c/p pull this to the far right edge of the banner, take a 2nd tree, mirror size this one down by 55% pull to stand on the right edge under the umbrella
Take the standing version of the tube c/p size her down by 65% pull to stand by the umbrella
4 c/p pull to the left edge of the banner
13 c/p size this down by 55% pull to stand by tree take a 2nd copy and paste by the tree on right edge of the banner
14 c/p size this down by 55% pull to stand in front of tree on left edge of the banner
11 c/p size this down by 25% pull one to sit in front of the window, and take 2nd and 3rd put them in front of the trees
6 c/p mirror size this down by 41% pull to fly over the left tree
16 c/p size this down by 55% pull the string so it is over her hand on left side of the tube
Make a new raster layer for your copyright and credit to kit maker, add a name to the banner and you’re done…
Thank you for reading my tutorial
©LadyDragus~ 2023
Free banner


Mask the Pain

This tutorial is written in Corel 2021, but any version should work, this is written in hopes you have working knowledge of Paint Shop Pro or other graphics program… this is written by me, never meant to copy or look like your work…
I am using a PTU kit
By Honored Scraps
Called Mask the Pain


You can find this kit
Here Mask the Pain Kit
I am using a tube by
Anna Marine (16-2)

You can find this tube
Here Anna Marine 16-2
Open a 750x750 size tag(size down at the end)
Frame 4 c/p rotate 90° to the left, size it down by 60%
17 c/p size this down by 81% pull to the top of the frame
Take the tube we are using, the one with the stone she is laying on, c/p size this down by 85% pull to the bottom of the frame
59 c/p pull to the left edge of the tag over the bottom left of the tube
38 c/p size this down by 73% pull to the lower left edge of the tag
44 c/p size this down by 50% mirror pull to the far right edge of the tag
53 c/p rotate 90° to the right, then size this down by 50% pull to hang on the lamppost
40 c/p size this down by 28% pull to sit by black mirror
43 c/p size the candle down by 30% pull to sit by bottle
30 c/p size this down by 30% pull to lay on top of the lamp post
26 c/p using the Brightness/Contrast, use the settings below to make the flower a darker black, then size it down by 23% pull to sit on right edge of the boards on the ground

48 c/p mirror size this down by 35% pull to sit on top of the lamp post
13 c/p size this down by 35% pull to sit on left of black flower
21 c/p size this down by 30% pull to sit on bottom right of mask
60 c/p rotate 45° to the left pull to sit even with boards on the ground
10 c/p size this down by 35% pull to sit on boards by mask
28 c/p size this down by 25% apply the same setting for the Brightness/contrast to make it a darker black
Click on bottom layer of your tag
16 c/p 2 times on right edge of the frame (but behind) take a 3rd copy and pull it to the left edge of the frame
Open paper 7 using your rectangle tool draw one behind the frame, convert to a raster layer
Click on top layer of your tag; add a new raster layer for the credits to artist and kit maker, add a saying to the tag and your done
©LadyDragus~ 2023


Summer Splendor

This tutorial is written in Corel 2021, but any
version should work, this is written in hopes you have working knowledge of Paint Shop Pro or other
graphics program… this is written by me, never meant to copy or look like your
work…
I am using a PTU kit
By honored Scraps
Called Summer Splendor

You can find this kit
I am using a PTU tube
By Anna Liwanag

You can find this tube
Open a 750x750 size tag (size down at the end)
Frame 2 c/p size this down by 60%
E57 c/p pull behind the frame size it down by 71%
Add this drop shadow to the frame
Vertical 7
Horizontal-7
Opacity 53
Blur 7
Color black
Click on top layer of your tag
E53 c/p pull to sit on bottom of the frame
E52 c/p pull to the left inside of the frame, on the
legs of the tent
Take the colored layer of the tube we are using paste
her size her down by 29% pull to the right edge of the frame
E48 c/p size this down by 50% pull to sit in front of
tree
E02 c/p size this down by 31% pull to sit on right
edge of sand w/ drinks
E34 c/p size this down by 31% pull to sit on left of
beach bag
E10 c/p size this down by 31% pull to sit in front of
pineapple
E44 c/p size this down by 30% pull to sit on right of
bowl of fruit
E14 c/p size this down by 30% pull to left of bowl of
fruit
E9 c/p size this down by 44% pull to sit in front of
mermaid
E21 c/p size this down by 44% pull to the middle of
the tent
E45 c/p size this down by 34% pull to sit by bowl of
fruit
Click on bottom raster layer of your tag take paper 4
draw a rectangle to fit behind the tag, merge into raster layer …
Click on top most layer of your tag add a new raster
layer for the copyrights and credit to kit maker
Add a saying to the tag and you are done…
Thank you for reading my tutorial
©LadyDragus~ May 2022
Beautiful Life



Kit Match For


Stores I Sell At


Blog Trains for HODG






Forums


Blogs I follow


.gif)


















