

Followers

My Blinkies :)

tk-Lady-Dragus-Blinkie2 2yua6c9-zpse3dc4e4b SD-Lady-Dragus-Art-vi-zps3b1bdf76

Search This Blog

Creative Fabrica

2a

Creative Teams

Elvenstar-Art-Tube-Shop moonshinedezinezblinkie-Sue-Howe-vi Happy-Pumpkin 9be57116-ebb5-43f5-baa0-cd3588ecf7d4 Krysten_Art
MBMCT-blinkie SDLightning-Blinkie ctforsnco dany-blinkie-150x50-ani

Artists and Store I like

Lrfd-EXVv-o Zindy

DAHBlinkie Mistichakya tinyturtle ctforsnco bellablinki tooshtoosh-vi kJx6Gd6 2v2a-LUr-TWx-EGj7i Hania
MSCS-Blinkie o-1jm1qr1mv12ih1gf51s151e35iihc

SAS-Blinkie2

tk-Enchanted-Scraps-blinkie 9be57116-ebb5-43f5-baa0-cd3588ecf7d4 e3a80384-f010-4d01-a2ee-3bedc3aa9ca3 fc8c388d-9922-4d20-8949-d4531adfa041 moonshinedezinezblinkie-Sue-Howe-vi
Showing posts with label Dran Kit. Show all posts
Nov 19, 2026

 Froggy Winter 


This tutorial is written in Corel 2023, but any version should work, this is written in hopes you have  working knowledge of Paint Shop Pro or other graphics program… this is written by me, never meant to copy or look like your work…

I am using a PTU kit

By Dany Designs 

Called Froggy Winter Dreams


You can pick this up in her stores


I am using a PTU tube
By Kajenna 


(I got this when she was with PFD, I do not see this up in her store)

Here Kajenna DAH


I am using Mask 71 by Millie

Millie mask 72


Open a 750x750

Frame 2 c/p size this down by 40%
Take the tube with both frogs, c/p size them down by 25% pull to sit on left edge of flower on top of the frame

73 c/p size this down by 30% pull to the left edge of the frame

82 c/p size this down by 13% pull to the top of the frame

59 c/p size this down by12% pull to sit above the pink flower on the frame

2 c/p size this down by 24% pull to the bottom left of your tag

1 c/p mirror size this down by 24% pull to sit by the depot 

4 c/p size this down by 15% pull to sit on right edge of the frame

Take element 80 c/p size this down by 15% pull to sit in front of the luggage 

31 c/p size this down by 15% pull to stand on the left edge of the train

80 c/p size this down by 15% pull to sit on the ground in front of the frog

3 c/p size this down by 6% pull to sit by the frog

21 c/p size this down by 6% pull to sit on left edge of the bag by the frog

5 c/p size this down by 6% pull to sit on the right edge of the bag by the frog

49 c/p size this down by 6% pull to sit on the right of the luggage 

36 c/p size this down by 6% pull to sit on far right edge of the tag

32 c/p size this down by 12% pull to sit on the right side of the cat

Click on bottom layer of your tag open p11 size this down to 700x700 ( i normally size my tag down to this also) apply mask from above, then merge this into one layer

Click on top most layer of your tag add the copyrights and credit to kit maker, then add a saying to the tag and you are done… 


Thank you for reading my tutorial 

©LadyDragus~26

Tags for kit maker


Sep 26, 2026

New Creative Team 

 Velvet Frost 


This tutorial is written in Corel 2023, but any version should work, this is written in hopes you have  working knowledge of Paint Shop Pro or other graphics program… this is written by me, never meant to copy or look like your work…

I am using a FTU Kit and tube

By Dany Designs 

I am using her Velvet Frost kit and Matching tube Nrya 


Here https://graphics-by-dany.blogspot.com/

I am using a Trese mask 0043

Here https://tresepsptags.blogspot.com/
Here masks are all in bundles on the left edge of her blog


Open a 700x700 size tag

Frame 2 c/p size this down by 50%

5 c/p size this down by 36% pull to the bottom right corner of the frame

8 c/p sized this down by 29% pull to sit in front of the fern

I am using the close up tube c/p size her down by 31% pull to the bottom of the frame

28 c/p rotate 45° to the left size it down by 24% pull to the far left edge of the frame

50 c/p size this down by 21% then pull this to the far left edge in front of the silver feather with jewel

42 c/p size this down by 15% pull to sit in front of the mushrooms

38 c/p size this down by 15% pull to sit on right side of the mushrooms

48 c/p size this down by 15% pull to sit in the hour glass 

35 c/p size this down by 15% pull to sit on left edge of the jeweled box

37 c/p size this down by 19% rotate 90° to the right pull in front of the hour glass 

18 c/p size this down by 19% pull to the right side of the card

29 c/p size this down by 15% pull to lean on the potion bottle

Click on bottom layer of the tag flood fill with paper 6 apply mask from above, then merge inot one group …


Click on the top most layer of your tags, add a new layer for the credits to the AI maker and Kit maker, add a saying to the tag and you’re done… 


Thank you for reading my tutorial 

©LadyDragus~26
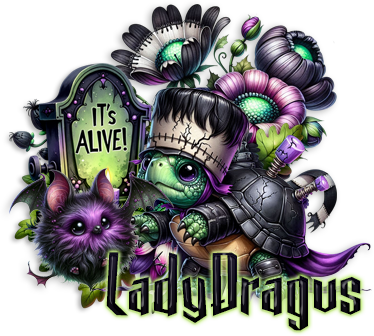

Tag for kit maker

the 2nd tag I made with a different tube 


Jan 24, 2014

Ah such a Stem punk kind of day
This tutorial was written on January 24 2014
If it resembles any other tutorial it is not meant or intended to copy
I wrote this out of my own mind and body
Used PTU artwork and PTU Scrap kit’s
I am using the PTU artwork of
Batschis Poser-Design

I got this poser from Sweet PinUp since I’m on their
Creative Team
You can find her tubes and so many other
Wonderful things at their store

I’m using a PTU Scrap kit By DRANDeisgn
She sells at a few stores
You can find them all
And one for Daniela for the usage of her kit 


I’m using a FTU mask by Bab’s BitzyBeez Designz Blog
It’s one of the 2 older steampunk mask I’m using BBD_2012SPMask4
You can get all her mask’s
Here http://babspsp.blogspot.com/

I am using the font names Yataghan
You should be found on all FTU Font websites

Open a 610x610 size tag

Frame2 c/p re-size it by 75% and leave in the middle of your tag…

Take your tube or one of them I’m taking the one where she is looking over her left hand shoulder I’m using my selection tool and cropping off down just below her shorts on the tube, then re-size by 75% that will put that part of the tube even with the inside of the frame…
Element60 c/p mirror and re-size by 55% and pull to the left hand side of tube so it just covers her body, but not her face…

Element1 c/p re-size by 45% pull to the bottom of the tube
Element 18 c/p re-size by 60, pull the right hand side of the heart even with the tight part of the ribbon..
Element 10 c/p re-size by 50% pull to the upper left hand side of your frame
Element 55 c/p re-size by 55% pull to the bottom of the chain to make it look like the chain is holding on the to watch, merge the watch down onto the chain to make it one element…
Element24 c/p re-size by 65% pull to the right hand side of your frame, so it looks to be crawling up the frame, it will cover a very small portion of the tubes arm…

Element 39 c/p re-size by 45% pull to the lower right hand side of your tag add a sharpen to the element
Element 8 c/p re-size by 35% pull to the upper left hand side of frame just above the top of the chain
Element 29 c/p re-size by 50% pull to the upper left hand side of frame, Make the wings settle in the middle of the brown ribbon
Element 59 c/p re-size by 45% pull to the lower left hand side of tag
Got to the very bottom of your tag, and paste element 39 pull it up to the upper top left of frame where only one of the jewel’s is showing copy and control +E and mirror it do the same on the right hand side of frame,

Flood Fill your very bottom layer with Paper 10 apply the same mask I’m using, merge the group then rotate 90° to the right and pull it even with the inside of the frame, where just the steam punk gears are showing
Add your copyright for the tube and credit if the kit maker requires it
Make sure you put your SPU License number also…


Kit Match For

Elvenstar-Art-Tube-Shop Krysten_Art 9be57116-ebb5-43f5-baa0-cd3588ecf7d4 tk-Savage-Dezines-Blinkie-vi

Stores I Sell At

Ho-DG-150x150 rendeart-fan

Blog Trains for HODG

tk-Passion4-Scrapz-blinkie efrbt MDblogtrainlinkie CKlogofall
Midnight-Garden-Blinkie-Final-vi 05096135-59a1-4faa-98a8-c456e8bb2ddd

Forums

These have my permission to use my FTU kit for challenges and Cluster Frames for the Forums 2v2epcn-PMx-Am-EMC
MBM1Blinkie2021

Blogs I follow