Labels CT Teams
- IPD-CT (409)
- PTUClusterFrames (239)
- RebeccaSinz-CT (159)
- Crystal-CT (127)
- CT-HODG (97)
- Honored Scraps-CT (83)
- IPD-Match (50)
- WickedPrincessKit (47)
- Help4Casper (42)
- CT-Ishika (41)
- HappyPumkinCT (41)
- HODG (32)
- HODGPTU-CF (32)
- HODG-Store (27)
- YudesKreationz (26)
- HODGLD (23)
- Carita Creationz-CT (22)
- DeniseCArt-CT (22)
- YKS-CT (20)
- EnChan-CT (19)
- Hania'sDesign (19)
- O'Srap Blog Train (18)
- Scrap Dimensions (16)
- Honored Scraps (15)
- HappyPumpkin (13)
- Passion4Scraps (9)
- Chrisje's-CT (8)
- EscapeR-blog (7)
- MélinouCT (6)
- MDBT (4)
- Scraps Dimensions (4)
- YK-CT (2)
- HODGPTU CU Tube (1)
Search This Blog
Aug 5, 2016
Friday, August 05, 2016 | Edit Post
Time to be a Dragon
Pirate
This tutorial is
written in Corel X5, but any version should work, and it’s written in hope’s
you have a working knowledge of Paint Shop Pro, or other graphics program…
This is written by
me, and not meant to copy or look like others’ work…
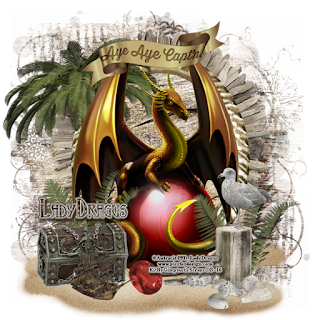
I am using a PTU
Kit By
Gimptastic Scraps
Called
Yo Ho, Yo Ho
A pirate themed kit
She sells at a few
stores you can find them all on her bog
Here Gimptastic Scraps
I am using a wicked
Dragon tube
By
Antracit
He/she sells the
artwork at
Pics For Design
Here ~PFD~Pics For Design
I am using a FTU mask
By MoonBeam and
Spider web mask (62)
You can find all of
her goodies
Open a 725x725 size
tag, you can downsize it later
Frame 2 c/p re-size
by 80%
Take frame 3 c/p pull
it behind frame 2 pull so it show’s up on the top most part of the frame…
6 c/p pull to the
bottom of your tag, c/p mirror and pull to the left hand edge of your tag; this
will be 2 layers of the sand…
14 c/p re-size by 85%
pull to the far left hand edge of your tag…
On the tube you will
have to merge the color layers you want to use, then re-size it by pixel to
600high and it will fit in the middle of the frame…
33 c/p re-size by 5%
pull to the far right hand edge of your tag, copy and put one on the left hand
edge of your tag also…
12 c/p pull to the
top of the dragon wings re-size by 70%...
10 c/p re-size by 45%
pull to the lower left hand edge of your tag…
7 c/p re-size by 35%
pull to the lower right hand edge of the tag…
2 c/p re-size by 55% pull
to make them cover the bottom edge of stump…
11 rotate 45° to the
right re-size by 55% pull to the right hand edge of the chest…
18 c/p mirror re-size
by 45% pull to make it sit on top of the stump…
28 c/p mirror re-size
by 30% pull to the far left hand edge of your tag…
Go to bottom layer of
your tag flood fill with paper 4 apply mask from above
Now go to top most
layer of your tag make a new raster layer, and add your copyright and credits
for the kit maker , a saying you want on the tag and your done..
Thank you for
reading/doing my tutorial
©LadyDragus~2016
Tag for kit maker and mask maker

Labels:Gimptastic-CT,MoonBeam-Mask,PFD-Tube
Subscribe to:
Post Comments
(Atom)
Labels
- AORK-Mask (28)
- AbbeyDawn (4)
- AlecRud (11)
- Alehandra Vanhek (42)
- Alex Prihodko (58)
- Amberly Berendson (1)
- AndyCooper (2)
- Anna Marine (5)
- AnnaLiwanag (15)
- ArthurCrowe (24)
- ArtofFreyatube (3)
- Atarikatube (5)
- AtillaTube (1)
- BCA-Awarness (6)
- BarbaraJensen (6)
- BeckyP-Temp (9)
- Blog Train (1)
- BlogTrain (41)
- BreastCancer (1)
- BrutaDesignsMask (1)
- BrutalDesigns Temp (2)
- CDO-Tube (75)
- CILM-Tube (16)
- CU/AI (5)
- CU/PU (17)
- CU/PU-PGD (1)
- Carita Creationz-CT (22)
- CarolinaSeabra (3)
- DannyLee (1)
- Doodlebydesign (3)
- Eennizzietube (8)
- Elegancefly (76)
- EscapeR-blog (7)
- Exclusive PFD (51)
- FTU FTU-CU (7)
- FTU Kit (55)
- FidorovaMaria (4)
- Fiodorova_Maria (4)
- FourmStyletut (1)
- FoxFoggyDog (5)
- Free wallpaper (33)
- FreeBanner (18)
- Goldwasser (9)
- HODG-Store (27)
- HODGLD (23)
- HODGPTU CU Tube (1)
- HalloweenSnags (12)
- Help4Casper (42)
- HorsePlayMask (2)
- HorsePlayTemp (12)
- JoseCanoTube (32)
- JosephineSha (1)
- JuliaFoxtube (4)
- KarmaMask (14)
- LadyMishkatube (12)
- Laguna (4)
- Lin Temp (1)
- MagDreamblog (3)
- MartinAble (6)
- MarusovA (2)
- MarusovA ART (1)
- MelissazMask (2)
- Michel Calandra (1)
- MillieMask (65)
- MillieTemp (33)
- MizTeequeTemp (2)
- NocturnTube (55)
- NocturneTube (5)
- O'Srap Blog Train (18)
- P4SBlog (5)
- Passion4Scraps (9)
- RachelDesigns (15)
- RachelDesignsMask (211)
- SimoneMask (20)
- SyllyTemp (3)
- VivMask (35)


.gif)


0 comments:
Post a Comment
Thank you for reading my tutorials and snagging my snags. I design under House of Dragus Graphics by LadyDragus