Labels CT Teams
- BlogTrain (28)
- CT-HODG (84)
- Chrisje's-CT (4)
- Crystal-CT (117)
- DeniseCArt-CT (17)
- EnChan-CT (12)
- Fantastically Free Blog (11)
- HODG (32)
- HODG-Store (16)
- Hania'sDesign (19)
- HappyPumkinCT (30)
- HappyPumpkin (11)
- Help4Casper (43)
- Honored Scraps-CT (81)
- IPD-CT (401)
- IPD-Match (50)
- MDBT (2)
- O'Srap Blog Train (16)
- PTUClusterFrames (228)
- Passion4Scraps (2)
- RebeccaSinz-CT (153)
- Scrap Dimensions (15)
- Scraps Dimensions (4)
- WickedPrincessKit (44)
- YK-CT (2)
- YKS-CT (9)
- YudesKreationz (20)
Search This Blog
Sep 24, 2013
Tuesday, September 24, 2013 | Edit Post
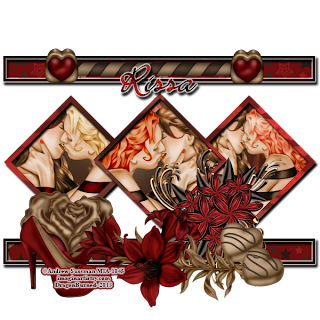
Wrapped in Chocolate
By LadyDragus
I wrote this tutorial
on September 24 2013
Any resemblance to
another is not meant, it came from my own mind today
I’m using the artwork of
Andrew Sussmann
You need a license to
do use his work
You can get that here
MTA~MyTubedArt
I’m using a PTU Scrap
kit by Rissa’s Designs
I’m using a FTU
Template by Horse Play pasuters
Number 112
I’m using the font
called Scrap Calligraphy you can find it on many Font sites.
Remove the copyright
layer by deleting it
Just clear the
background layer so we can use it later with a color from the tube/kit we use.
Open paper 7 and
flood fill
Right Diamond
Left Diamond
Center Diamond
Now open paper
Flood fill
Right Diamond Frame
Left Diamond Frame
Center Diamond Frame
I’m going to add a default
drop shadow
Of
Vertical 5
Horizontal 3
Opacity 100
Blur 5
Color Black
**save your tag in
case your PSP Crashes**
With the tube I’m
using it has 4 different color choices on the hair/ and ribbon
Pick 3 of them so you
can use them in the tag
Copy paste the first one
over Left Diamond and then click on the frame above the tube using your
selection tool select in side of the frame, click back on your tube go to Selections
Modify expand 5 and cut the tube out
I did Left diamond
then center diamond
On the Right diamond
I re-sized the tube by 75% and pulled it to the middle of the Right diamond…
Open paper2 flood
fill Bottom Rectangle frame and Top rectangle frame
Remove the Top Circle and the Bottom Circle from
the Template
Click on the
Rectangle frame and flood fill with the darkest brown on the color swatch on
the right hand side of the swatch…
Add a gradient glow
of white to the Rectangle frames on the layers…
Open CR_Flowers* c/p
re-size by 50% pull to the middle of center and right diamond…
CR_HeartRose c/p
re-size by 40% pull to the lower left hand corner of your tag…
CR_Shoes2 c/p re-size
by 30% pull to the bottom of the heartrose…
CoCoHearts c/p
re-size by 25% pull to the bottom of CR_Flowers
CR_lilies2 c/p rotate
to the left by 90° then rotate another 25° then re-size by 60% pull to the
middle bottom of your tag, should be over part of shoe but behind the CoCo
Hearts
Now click on the
layer Top Rectangle Frame and paste CandyStick
Re-size by 60% pull
it to the middle of the frame…
Open ChocoCandy c/p
re-size by 15% copy the re-size and paste it on the same layer on the other end
of the candy stick…
Add your copyright to
the tag and your water mark if you use one, then your done.
Make sure you put a
saying on the tag also
No blank tags are
allowed..
Thank you for reading
my tutorial
LadyDragus…
One for the store, the artist, the kit maker and the template maker...
Thank you
I'd love to see what you make out of this, tag's for me are never necessary..
Labels:CT-MTA,RissaScrap
Subscribe to:
Post Comments
(Atom)
Labels Artist
- AORK-Mask (27)
- AlecRud (11)
- Alehandra Vanhek (42)
- Alex Prihodko (57)
- Amberly Berendson (1)
- Amy&LeahTemp (5)
- Amy-Mask (1)
- Angiemask (1)
- Anna Marine (5)
- AnnaLiwanag (15)
- ArthurCrowe (24)
- ArtofFreyatube (3)
- Atarikatube (5)
- AtillaTube (1)
- BBDMask (10)
- BJDMask (2)
- BlogTrain (28)
- BrutaDesignsMask (1)
- CDO-Tube (75)
- CarolinaSeabra (2)
- ChoasPriestessFTU (2)
- Cluster Frames (144)
- DAH-Tube (19)
- Dave-FS (4)
- Dee-Temp (21)
- Dee-mask (53)
- DesignsbyAliTemp (2)
- DesktopWall (6)
- DilaraTube (6)
- DragonflyMask (14)
- Elegancefly (72)
- Elias Chatzoudis (17)
- EllenFox (1)
- Ellie_Milk (10)
- Enys Guerrero (1)
- Eskada (2)
- EugeneRzhevskii (4)
- ExEleganceflyTube/kit (35)
- Exclusive PFD (51)
- FTU Kit (51)
- FTU Snags (221)
- FidorovaMaria (3)
- FoxFoggyDog (5)
- Free wallpaper (32)
- FreeTLB (14)
- Ishika-Tube (9)
- MCMask (1)
- MelissazMask (2)
- MyTemp (13)
- PFD-Exclusive (19)
- PFD-Exclusive Tube (137)
- PFD-Tube (273)
- RachelDesigns (15)
- RachelDesignsMask (212)
- RachelTemp (14)
- SimoneMask (19)
- Snags Wallpaper (1)
- Time Line Banner (9)
- VIxmask (55)
- VaryMany (1)
- VivMask (34)
- VixTemp (2)
- Wallpaper (9)
- Weescotlass-mask (9)
- ZindyNielsen (34)


0 comments:
Post a Comment
Thank you for reading my tutorials and snagging my snags. I design under House of Dragus Graphics by LadyDragus