My Blinkies :)



Creative Fabrica

Creative Teams









Artists and Store I like

















Showing posts with label PandoraTubeEX. Show all posts
Showing posts with label PandoraTubeEX. Show all posts
Jun 10, 2016
Do you Believe in Magic?
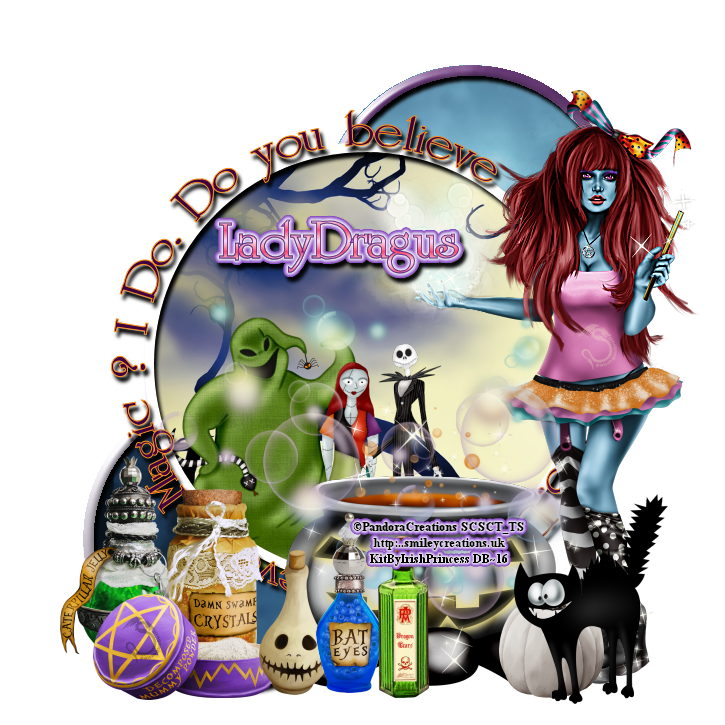
Believe In Magic
By
Trish Schaffer
This tutorial is
written in Corel X5, but any version should work. It’s written in hopes you
have a working knowledge of Paint Shop Pro or other graphics program.
It’s written out of
my own thought’s never meant to look like others tags…
I am using a
Exclusive kit and tube
Kit by Irish Princess


And the tube is by
Pandora Creations
 This is one layer only on the tube you can not colorize it

You can find them
I am using a new
template

I created just for
this tutorial
Called Believe in
Magic
You can download it
Here Believe In Magic
This template is
725x725 you can size down if you want
The font I’m using
for this temp and what I’m going to use for the words
Is Salinas it is a free font
Delete the font info,
the copyright layers…
Raster 4 flood fill
with paper8
Raster 5 flood fill
with paper 7
Add this bevel to the
layer

I do not mess with
the other 2 tabs for bevel…
Add this drop shadow
(will be my default for this tutorial)
Vertical 5
Horizontal 3
Opacity 100
Blur 5
Color black
Raster 2 flood fill
with paper2
Raster 6 add the drop
shadow from above…
8 c/p re-size by 35%
pull to the far side of circle…
3 c/p re-size by 35%
pull to the right of green element…
5 c/p re-size by 40%
pull to the right of sallie…
Click on raster 3
paste your tube re-size her by 30% mirror pull to the very far right hand edge
of your tag…
19 c/p re-size by 20%
pull to the front of the tube…
70 c/p re-size by 80%
pull to cover the cauldron of the tube…
57 c/p re-size by 35%
pull to the lower left hand edge of your tag…
58 c/p re-size by 30%
pull to the right of green bottle…
25 c/p re-size by 30%
pull to the middle of Crystals …
66 c/p re-size by 30%
pull to the left of mummy powder…
56 c/p re-size by 30%
pull to the right of skull bottle…
51 c/p re-size by 30%
pull to the right of bat eyes…
31 c/p re-size by 35%
pull to the right of pumpkin…
Thank you for reading my tutorial I hope you enjoyed it...
I also made up a set of 3 PTU cluster's using differnt tube's to show how wonderful the kit is
Preview of cluster frames


Preview of cluster frames

You can find the clusters



Jun 8, 2016
Picture Candy Magic

Kit by Happy Pumpkin
You can find it

Tube is an exclusive
to Smiley’s Creation shop

I am using a FTU
Template
By Dee
(Dangerously Designs
Called Picture Us
You can find all of
her temps on her blog
Delete the font info
and the credit info
Up-size the template
to 715(use the canvas size to just get the bottom layer)
Purple Circle flood
fill with paper2
Dotted Circle add a
gradient glow of a color off the tube I used the pink in her hair bow
Glow Width 9.02
Soft Corner 25
Overall Opacity 100
The layers with the
white frame I am using paper 7 and flood filling the Border”
Do this on all 3
layers
Top Left white and
Top Right white flood fill with Paper 7 also
Top left pink flood
fill with paper 3
Top right pink flood
fill with paper 1
Click on the top
right pink, and paste a close up version of your tube, re-size it to fit inside
of the box, make sure the Gradient overlay is over the tube, then rotate 9° to
the right she will match up with the bottom of the layer…
Word art black add
the same color from the gradient glow above for the circle layer…
Merge all 3 layers of
the word art into one layer…
44 c/p rotate 90° to
the left pull up to the top most corner of your tag/tube…
3 c/p re-size by 40%
pull to the middle of the bottom black bow…
1 c/p re-size by 35%
pull to the far left hand edge of your tag…
13 c/p re-size by 20%
pull to the right of bottle…
15 c/p re-size by 15%
pull to the right of candy…
14 c/p re-size by 15%
pull to the left of purple/green candy…
5 c/p re-size by 35%
pull to the very far right hand edge of tag, the (th), will be behind the
kitten…
7 c/p re-size by 20%
pull to the left of kitten…
6 c/p re-size by 35%
pull to the upper left hand corner of your tag, over the black bow….
Go to the upper top most layer of your tag add a new raster layer for your credit's and what ever saying you want on the tag
Tag for template maker and kit maker


Subscribe to:
Posts
(Atom)
Kit Match For


Stores I Sell At


Blog Trains for HODG






Forums


Blogs I follow


.gif)


















