My Blinkies :)


Creative Fabrica

Artists & Stores


Blogs I follow


Showing posts with label TLB-Tut. Show all posts
Showing posts with label TLB-Tut. Show all posts
Nov 24, 2015
Christmas Wishes
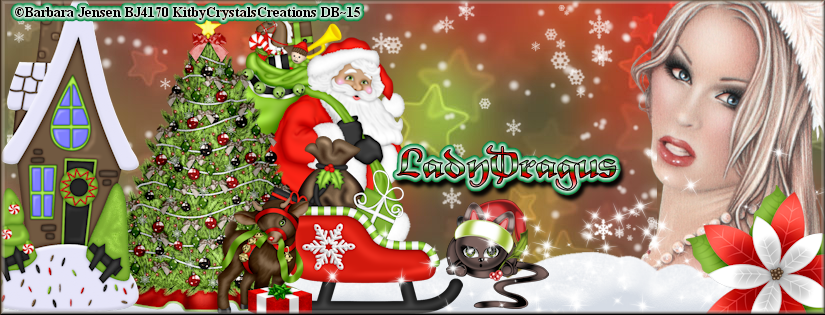
Hello it's almost that time of year when we all start preparing for Santa Clause
So why not start off with a brand new time line banner tutorial
Christmas Wishes’
This tutorial was
written by me, from my own thoughts and words. It is written in Corel X5, but
any version should do. It is also written in hope’s you have a working
knowledge of Paint Shop Pro or other graphics program…
I am using a PTU Kit
By


Called Christmas Wish
Here
I am using the PTU
artwork of
Barbara Jensen out of
a Single layer pack
Santa’s Girl 2 Close
up
You can find all of
her artwork in her store
Here Barbara Jensen Tubes
This is a Time line
banner tutorial
So you will need a
825x315 size banner to make this tag…
Raster 1 flood fill with
paper 11
EE16 c/p re-size by
45% pull to the middle of the tag…
Take the raster layer
with the hat on the tube, and paste and mirror pull to the far right hand edge
of your tag…
EE13 c/p pull to
where the right side of snow is on the very edge of the tube…
EE8 c/p pull it to
the bottom edge of banner…
EE44 c/p re-size by
50% pull to the far left hand edge of your banner…
EE6 c/p mirror
re-size by 35% pull to the right of the Christmas tree…
EE7 c/p re-size by
45% pull to the far left hand side of tag, you will need to move the tree and
sled over to the right some…
EE17 c/p re-size by
20% pull to the left hand edge of sled…
EE25 c/p mirror
re-size by 25% pull to the far right hand edge of sled…
EE9 c/p pull to the
bottom right edge of tag so it covers the tubes’ shoulders…
EE45 c/p re-size by
30% pull to lower right hand edge of your tag…
Thank you for reading my tutorial
Here is a free time line banner also

Banner for Barb


Nov 4, 2015
Dreaming of You

This tutorial is
written in Corel X5, but any version should work, it’s written in hopes you
have a working knowledge of Paint Shop Pro…
This is written by me
out of my own mind and thoughts, never meant to copy or look like others work.
This is a Time line
banner tutorial along with the matching avatar for Facebook…
I am using the PTU
artwork of
Jenna Whyte
She sells all of her
artwork
I am using a PTU kit
by
Devlish Dezines
She sells at a lot of
stores
I am using this as part of my CT work
For Artistic Dreams Imaging
You can find Sheila's Kit's
I am using UVF
Mussica Swash
This can be found on
most FTU sites
Open a 825x351 size
banner
I use a larger size
avie 300x300(it will fit)
Flood will with
paper12
Paste your tube in
the right hand edge of your banner, using the opacity for the layer take it
down to 65…
E27 c/p re-size by
55% pull to the lower right hand edge of banner, it will cover the bottom edge
of your tube c/p mirror pull to the far left hand edge of your banner
Add this drop shadow
Vertical 5
Horizontal 3
Opacity 60
Blur 5
Color black
E9 c/p re-size by 65%
add the gradient glow
Below

* then add the
drop shadow from above*
E38 c/p mirror
re-size by 35% pull to the left hand edge of banner…
E21 c/p re-size by
25% pull to the right hand side of mushroom…
E70 c/p mirror
re-size by 30% pull to the far right hand edge of your banner add a sharpen
more then, move tube so you can still see it …
E76 c/p re-size by
25% pull to the right hand side of mushroom…
E42 c/p re-size by
45% pull to the right hand edge of skull
E10 c/p re-size by
25% pull to the right hand edge of torch…
E89 c/p re-size by
55% pull to the far right hand edge of your banner…
Add a new raster
layer for your copyright’s and credit to kit maker if they require it…
I always add
buttonize to a separate layer to close off the banner..
Now for the avatar,
Use the same paper as
the banner for the bottom layer
E27 c/p re-size by
65% add a sharpen more and the drop shadow from above…
E38 c/p re-size by
35% pull to the lower right hand edge of your avie…
E21 c/p re-size by
35% pull to the middle of mushroom…
E56 c/p re-size by
35% pull to the lower left hand edge of avie…
Thank you for
reading/doing my tutorial…
Add your name, and
make sure you put
Kit by Devlish
Dezines since all we used for the avatar…
LadyDragus 2015
Banner for Sheila

Jul 5, 2014

I just wanna Zombie
Birthday Party
I’m using a PTU Kit
by
Wicked Princess
Scraps
She sells at many
stores,
You can find them all
on her blog
I am using a Matching
tube by
Joahanna von
Frankenstein
She currently sells
at
The PSP Project


I am writing a Time
Line Banner tutorial for you tonight
It is a full size
one, not for group banners
So open an 825x315
size tag
180x180 avatar
Take Frame3 c/p
re-size by 75% mirror and pull all the way to the right hand end of the banner,
take your full size tube which is layer 3 of the tube, and paste it behind the
frame
Crop her head and
part of the cake out of the picture delete the rest, and pull it to the middle
of hole in the frame…
Now click on top of
the frame open cake, paste it as a new layer, and re-size it by 50% pull it to
the left hand just over the cake on the tube…
Candy2 c/p re-size by
50% pull over the holes in the frame…
Bow c/p re-size by
35% pull to the top of the candy stick…
Gift1 c/p re-size by
25% pull to the lower left of the cake…
Bottle4 c/p re-size
by 25% pull to the right hand side of gift1
Blower2 c/p mirror,
rotate 45° to the left, re-size it by 40% pull it even to the right side of the
tubes mouth…
Cup c/p re-size by 40%
pull to the left hand side of cake, and gift1
Hat c/p re-size by
20% pull to the right of the toxic bottle, sharpen the element, and add
This drop shadow
Vertical 5
Horizontal 3
Opacity 75
Blur 7
Color black
Bag c/p re-size by
20% pull to the right of the hat, add a sharpen more to the bag…
Cupcake1 c/p re-size
by 25% pull over in front of cup…
Click on the very
bottom layer of your banner and flood fill with
Paper 5..
Now on to the avatar
I normally just use a paper from the kit, and add my name to it…
I am using Paper7 to
flood fill the bottom layer of my avatar
Then add your name…
I add a 3rd
layer, and buttonize with the green from the background paper..
Then go back up to
the top layer, add a new one to add your copyright
To give Wicked
Princess Scraps credit since that is in her TOU’s now
Kit by Wicked
Princess Scraps
Thank you for
reading/doing my tutorial
Apr 24, 2014

Good Day to all
Welcome to the Mad
House again
I’m writing this Time
Line banner tutorial in Corel X5
Most of the settings
I use can be found in all Paint shop pro products.
EyeCandy 4000 I think
you have to buy, I’ve had it for ever.. Graident Glow is part of this plug-in
for PSP…
This is written in
hopes you have some knowledge of Paint Shop Pro
Any version should
work
I’m using a PTU Scrap
kit by Scrappin with Lil Ole Me
You can find her blog
She sells at many
different stores

But I’m a Creative
Team member for D’zines from the Heart
It’s where I got her
kit
I’m using a Pre-paid
project from the PSP Project
I got this tube at
there store
Here The PSP Project
Open an 825x315 size
banner
cm-e13 and go into
the Seamless Tiling Effect in PSP
I’m using these
setting’s below

After applying the
settings shown in picture
Add a gradient glow
of Light blue(aqua) of these setting
Glow Width (pixels)
10.00
Soft Corners 25
Overall Opacity 100
(check mark in )Draw
only outside Selection
The color of the blue
I’m using is
R:128
G :255
B: 255
Add these Drop shadow
settings
Vertical 5
Horizontal 3
Opacity 100
Blur 5
Color black
Take your tube and
paste it behind this layer, and pull her to very far right
Where her face and
arm are the only part showing, some of her chest will show that’s ok.. Do this
on both side’s of the banner… (Save often)
Go to the very bottom
layer and flood fill with paper 20
*now I’m merging some
of the layers as to save on space, you do not need to do this if you have a
faster processor than me... (LOL)
El-10 c/p re-size by
75% and pull to the right hand side of your banner, it will cover the corners,
but that’s ok
Ele-77 c/p re-size by
25% pull to the middle right, copy and mirror
Pull this copy to the
left hand side of the banner
Ele-63 c/p and
re-size by 45% pull to the bend in ele-10
Ele-81 c/p mirror
image, re-size by 25% pull to the left hand edge of banner, beside the
mushroom…
Ele-59 c/p re-size
25% pull to the middle, add a high pass sharpen
With these settings
Radius 15
Strength 50
Blend Mode : Overlay
El-58 do the same
settings as el-59 mirror the ball pull up beside the other ball…
El-15 c/p re-size by
25% rotate 45° to the left, pull even with the left hand side of diamond, then
add the drop shadow from above..
El-15 c/p re-size by
20% pull in the middle of the two balls, then add a sharpen more to the
element..
I add an extra layer
and using the bottonize feature put one around the banner with the aqua color
from above… What ever settings you wish
I used
Height 5
Width 5
Opacity 100
Transparent edge…
Add your copyright
layer to the banner, Remember only the © and the artist name with your Lic# are
allowed on facebook, you can not post a link on your time line banner
As for an avatar I
just picked a color from my tube and put my name on it
I made a banner for the kit maker also

Feb 25, 2014

Spring Fairy
By LadyDragus
This tutorial is
written in hope you have working knowledge of PSP
I am using version 9
but any version should work
This tutorial is not
meant to look like any other tutorial
No copying on my
part…
I’m using a PTU
artist by the name of Sarah Pauline

You can find her
artwork at
MytubedArt
Here MTA~MyTubedArt
Her copyright is also
to the store
I checked with
management and
they said that is what goes on the copyright
layer
I am also using
a PTU Scrap Kit by
She sells at many stores you can find them all
Here Crystal's Creations


Open a 825 x 315 Time
Line banner
Paper 8 you are going
to use your selection tool, and crop out the bottom of the paper, and use Ctrl+V
to make it a new image, then re-size that on the long side to 825 leave the
bottom number alone it will fit in the banner
Copy the re-size
version as a new layer, add a sharpen to the paper
Take your tube and
paste in the middle of your banner
Ee24 paste as new
layer, leave in the middle, pull your tube to where the face is in the middle
of the frame cut out the rest of the tube…
Ee3 c/p re-size by
50% rotate 45° to the left and pull it to the lower right hand corner of the
frame
Add Drop shadow of
these settings
Vertical 5
Horizontal 3
Opacity 50
Blur 5
Color black
Ee31 c/p flip pull to the top of the banner, copy the
flipped one and paste on same layer on the left/right hand side of the banner,
add a sharpen, it will look like green grass clouds…
Add the same drop
shadow from above
Ee36 c/p move to the
right hand side of your frame, try to make it even with the frame..you can
clean off any at the bottom where it is hidden behind the below element…
Ee40 c/p re-size by
50% mirror and pull to the lower right hand side of banner
Ee8 c/p re-size by
40% mirror set the bird on the rock, add a sharpen if you like
Ee9 c/p re-size by
30% pull close to the flower copy re-size mirror the second one, pull close to
the first flower
Click on bottom
flower insert
Ee34 re-size by 45%
pull in between flowers
Ee45 c/p move to the
right hand side of banner, and paste again on same layer to the left hand side
of banner
I am using the
Buttonize feather in effect’s and using a green from the banner
With these setting
Height 10
Width 10
Opacity 100
Edge ~ Transparent
Color of your choice
I’m using a green from the banner
Add your copyright to
the banner and what ever name you wish to use and your done
Thank you for reading doing my tutorial
LadyDragus
Feb 2, 2014

SO Pink Emo
Time Line Banner
Tutorial
I’m using a New Scrap
kit by
But it will be soon..
It’s called My Pink
Emo

You can find out
which store she is selling them
At here Crystal's Creatoins
I’m using the PTU
Artwork of Alex Prihodko
You can find his work
Here PFD~pics for design
825x315 size banner
is what I’m using
Flood fill bottom
layer, with paper8
Now using Times new
Roman with just the foreground for the font
Write the word EMO I
had to use 200 pixel size to make it readable, you can make it smaller if you
wish
Add a gradient glow
of white your choice of the size
The drop shadow I’m
using for this is
Vertical 5
Horizontal 3
Opacity 100
Blur 5
Color black
Now using the same
size font make another layer and use
I’m using paper 3 to
make the bottom of the word Emo
Now click on your
background layer(bottom layer)
Make a close up of
your tube, and pull it to the very far right hand side of your banner
I made sure the
“winter Makeup” was colored Pink but just the hair part erased the eyes
EE8 c/p pull to the
far left hand , it will look like’s its behind the tube, which is what you
want…Add drop shadow
Click on your bottom
layer EE13 c/p re-size by 30% your going to make 3 of them on the same layer
but far enough apart you can move them to 3 different areas
EE17 c/p on top
layer, re-size by 65% pull to the bottom of the Emo Border and make them look
like they on top of EE13, it will take some movement to get them to look like
they are coming out of the black splotch…
EE16 c/p re-size by
50% pull to the left hand side of E in Emo
EE34 c/p pull to the
bottom of EE17
Ee2 c/p re-size by
35% pull in between the E, and the M in Emo
Ee6 c/p re-size by
25% pull to the big part of the E, where it covers the middle of the E
Click on the bottom
layer of the word EMO, and open EE15 paste it as a new layer, pull it over the
words, but behind the border…
Take EE35 click on
upper top most layer, and paste as a new layer
Add your copyright to
the tag, and what ever name you wish to use on yoru banner
Make sure you do not
put the url since it is against FaceBooks TOU on time line banners
On this banner it
should read
©AlexPrihodko PFD####
picsfordesign and then your design name if you use that
If not it should just
be ©AlexPrihodko PFD#### picsfordesign
I always on banners
add a top layer and buttonize it with a light color from the tag
With these settings,
Height 5
Width 5
Transparent
Color Pink on this
one
Opacity 100
I do not normally
make a Avatar I just take a color from the tag, and flood fill it on a 180x180
and add my name…
Dec 14, 2013

Snow Dragon oh White
Dragon
I’m using a PTU tube
by the artist
Ariane Soares
You can find her
artwork
At MY Tubed Art
Here MTA~MyTubedArt
I’m using a PTU Scrap
kit by Bib’s Collection
She sells at one
store right now
Scraps and Company
But you can find the link for that on her
blog here Bibi's Collection
I’m using a tine line
banner template of my own
You can download it
from my blog
Here Snow Dragon Temp
Unzip the Time line
banner
Click on Stamp
background flood fill with Paper 11
Click on Border
Apply this Drop
shadow to the border
Vertical 5
Horizontal 3
Opacity 100
Blur 5
Color black
Go back to the stamp
background
Elem40 c/p re-size by
75% leave in the middle of your tag
Now take your tube
and copy paste as new layer
Re-size by 50% and
pull him over to the right hand edge of banner
Elem29 c/p re-size by
40% pull over to the left hand side of your banner
Elem 66 C/p re-size
by 40% pull over the feet of the dragon
Elem36 c/p re-size by
25% pull to the edge of Elem40 on the left hand side, add a sharpen to the
element
Elem63 c/p re-size by
25% paste on top of border by snow tree(elem36)
Elem19 c/p rotate 45°
to the right and re-size by 40% pull it over to the left hand side of banner,
then add a sharpen more to the element…
Elem2 c/p re-size by
50% add a sharpen more x2 then copy it mirror it and pull it to the right and
left hand side of tag
Elem 72 c/p re-size
by 50% add a sharpen more and pull it to the middle of the banner
Add your copyright to
the banner
*note remember URL’s
are not allowed on TimeLine banners*
And one for Bibi

Nov 25, 2013

I want Candy
I’m working with a
PTU Scrap kit
By Wicked Princess
Scraps
The name of the kit
is I want Candy
Shani Sells at many
different stores but you can find them all
Here on her blog Wicked Princess Scraps
She made the kit to
match Kiwifire Storms
I want Candy tube
sold at The PSP Project
Here TPP~ The PSP Project
You can get a bundle
pack of the kit and tube
I’m doing a Group
banner this time around
I’m chaging the size
just a bit as sometimes it covers the lower part of the banner
800x225
The normal size is
801x250
Paper 6 flood fill
the bottom layer…
CityScape c/p re-size
by 60% mirror and pull it over the far left hand side of your tag…
Copy the re-sized
cityscape and paste it pull to the right hand and mirror it
Take your tube and
cut out just the face and add it to the banner behind the right hand side of
the banner, but flush with the cityscape element…
Swirl2 c/p re-size by
55% mirror and pull in front of the cityscape but not on the edge of it…
Glitter1 c/p rotate
45° to the left, and add a Sharpen more to the element and add your drop shadow
Mirror c/p re-size by
25% mirror and pull to the left hand side of the banner (no avatar so it will
still show)
Mascara c/p re-size
by 20% pull to the bottom of mirror…
Lipstick c/p re-size
by 25% pull to the mirror also…
Polish c/p re-size by
25% pull it to the mirror but on the left side hand
Add your copyright,
Make sure it is just like this
© Artist Name and
Your LIC# no URL’s are allowed on group banner’s or Time line banners
Always add a saying
to the banner
I am using my Always
list and
Wicked Princess CT

Nov 19, 2013

Be Thankful
I am using Corel X5
for this tutorial
but you should be able to do it in any version of Paint Shop
Pro.
This is written in hopes you have a working knowledge of the program
I’m using a PTU Scrap
kit by Irish Princess Designs
The kit is called Bounty
She sells at many
stores
You can find them all
I’m using the PTU
artwork of Michael Landefeld
I got this when he
was with CILM
You can now buy his
art at CDO
I’m doing a Time Line
banner Tutorial
I enjoy doing them,
so I’m sharing
Open a 825 x 315*TLB*
(Banner size for personal Page size)
Flood Fill bottom
layer with Paper 2
IPD-Scatter c/p leave
in the middle of the TLB…
I’m using the close
up so
C/p and pull to the
very right hand side of your TLB
Frame 2 c/p re-size
by 50% pull your tube to the middle of the frame
Make it where her
face is showing, *you may have to re-size the tube *
Use your magic wand
inside of the frame, then click on the tube layer go to selections click modify
by 3 and cut it out, then deselect and delete extra tube…
I pulled the frame
and tube a little bit away from the side of the TLB
IPD-Wheat c/p re-size
by 60 add this drop shadow
Vertical 5
Horizontal 3
Opacity 50
Blur 5
Color Black
IPD-Swirl c/p re-size
by 60% pull to the bottom of frame, and add the above drop shadow…
IPD-Pumpkin pile c/p
re-size by 35% pull to the left hand side of frame…
IPD-Wagon c/p re-size
by 35% move to the right hand side of the frame just over the wheat…
Make sure you add your copyright for the artist and kit
maker if he/she requires it
Add a name to the
banner and your done…
I add an extra layer
and use my buttonize feature to close off the tag…

Nov 13, 2013

Fall Mermaid
Time Line banner for
Groups
I’m using a PTU scrap
kit by DRAN Designs
She sells at many
stores
You can find them all
Here DRAN Design
I’m using the PTU
artwork of Renee Biertempfel
I got this set of
tubes when she was with CILM
You can now by all
her artwork at
CDO~ Creative Design
Outlet
The banner size for
groups are 801x250 a little smaller than your timeline
But still easy enough
to work with…
Paper 8 flood fill
the bottom layer
Element 40 c/p pull
to the left hand side of banner, paste it again mirror and pull it to the right
hand side of the layer
Element 6 c/p pull to
the left hand side of banner,
Element 9 c/p re-size
by 50% rotate 45° to the right pull in the lower left hand corner of your
banner..
Take your tube and
paste it as a new layer pull her down so the face and midriff is showing, then
pull her over the right hand side of banner, then I added a sharpen more to the tube, and a drop
shadow, to make it stand out above the tag, use what ever drop shadow you wish
to use
Element 27 c/p pull
to the far right hand side of banner,
Element 26 c/p mirror
image pull to the right side of banner overlapping 27…
Element 47 c/p
re-size by 60% and pull it to the right hand side of your banner also…
Element 11 c/p
re-size by 40% pull him to the left hand side where it looks like he is sitting
on the flower, then re-size him by 70% pull down to lower corner…
Go up to the upper
top layer and create new raster layer,
Use your Buttonize
settings with
5 Height
5 Width
Edge: Transparent
Color from the
background
Opacity 100
Add your copy right
make sure you post it on the banner where it can be seen and readable ok
Add what name you
want on the tag
Thank you for looking/doing my tutorial
I'd love to see anything you make from them.. .
Subscribe to:
Posts
(Atom)
Stores I Sell At


All of my older kits are here Kits and Clusters Sold Separately

Forums

Blog Trains for HODG


Creative Teams